

Start with an image on the worktable.

Click Color in the ribbon, and then click the Hue Map tool in the palette to display the Hue Map dialog.
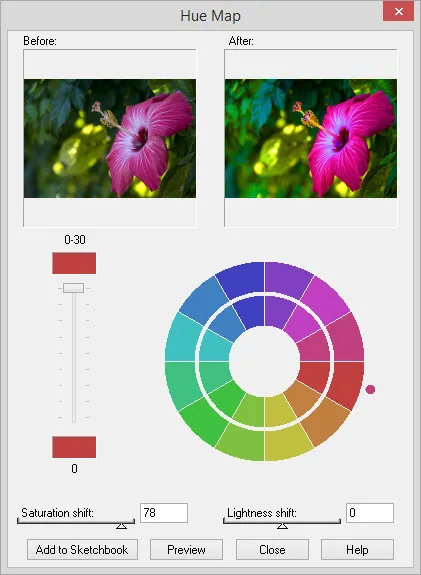
The Hue Map dialog lets you adjust specific hues in your image. The dialog shows the color wheel divided into 12 sections. Click on a color on the outer edge of the wheel that you want to adjust. You can also drag the little circle control around the circle to select a color. This color will appear at the top of the vertical slider. Drag the slider to adjust the color. The new color will appear in the inner circle as well as the bottom of the slider. The number value at the top of the slider indicates the 30-degree section of the color wheel that is being adjusted. As you drag the slider, the new value range will appear at the bottom of the slider.
- Saturation shift: This slider will shift the saturation of each pixel proportionally from its original value. For example, a setting of 50 will increase the saturation of each pixel by one half of its original value. Some pixels will start out highly saturated and some pixels will be very desaturated. They will all shift by one half of the original value. This keeps the relative intensity of the pixels in the original image yet makes the change in the saturation. Dragging the slider to the right (positive numbers) will increase the saturation. Dragging the slider to the left (negative numbers) will decrease the saturation. Values range from –100 to 100. A value of 0 preserves the original setting.
- Lightness shift: This slider will shift the lightness of each pixel proportionally from its original value. For example, a setting of 50 will increase the lightness of each pixel by one half of its original value. Some pixels will start out very light and some will be very dark. All the pixels will all shift by one half of the original value. This keeps the relative intensity of the pixels in the original image yet makes the change in the lightness. Dragging the slider to the right (positive numbers) will increase the lightness. Dragging the slider to the left (negative numbers) will make the image darker. Values range from –100 to 100. A value of 0 preserves the original setting.
Move the small dot around the outer circle to select the color wedge you want to adjust. Use the vertical slider to change the selected color. The inner circle wedges and the bottom color box of the vertical slider display the new color. In this example, only three colors were adjusted to create the new image.


