

 EQ Mini
Start a New Quilt
- Start EQ Mini.
- When the Welcome to EQ Mini box displays, click Close.
- When the Tip of the Day appears, click Close.
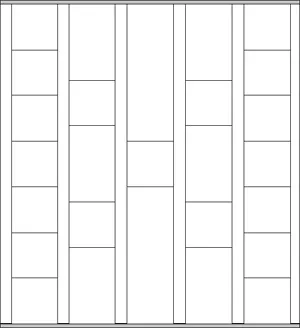
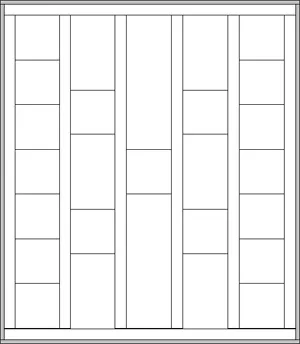
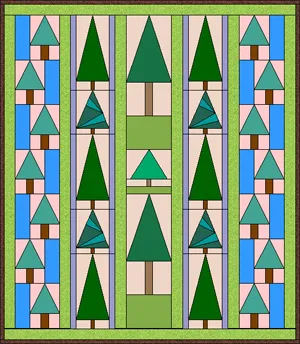
- Click Vertical Strip Layout along the left to see the sample on-point layouts.

- Click the first sample in the bottom row. If you float the mouse cursor over it, the tooltip says that it has five 12-inch plain strips and six 3-inch plain strips.
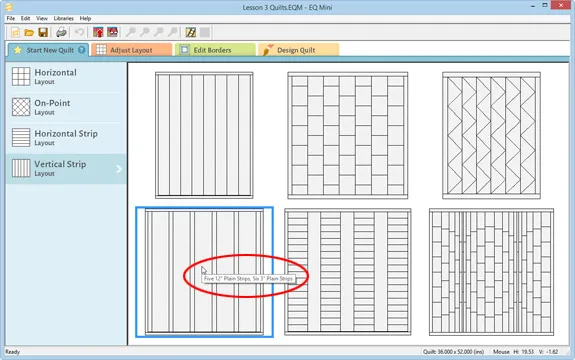
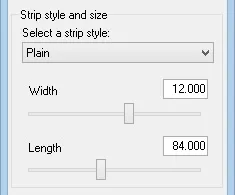
- Click the Adjust Layout tab along the top. The first strip is automatically selected and shows in gray. The palette shows that the strip is 3 inches wide and 84 inches long.

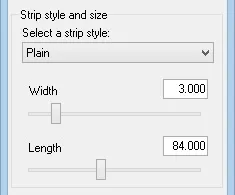
- Click the second strip. The palette shows that the strip is 12 inches wide and 84 inches long. Let’s change the style of the wider strips.

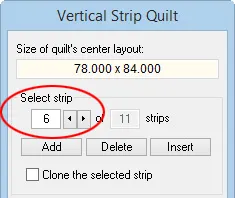
- Click the wide strip in the center of the quilt. Notice in the palette that it is strip 6 of 11.

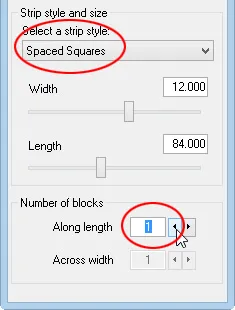
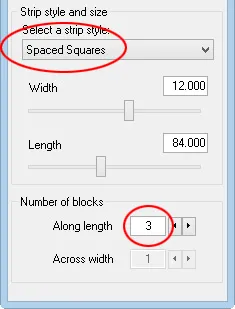
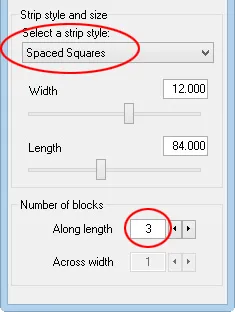
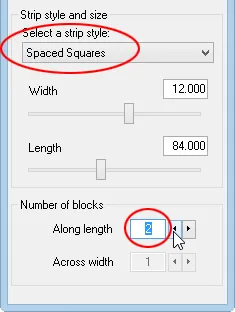
- In the palette under Select a strip style, click the down arrow to see the list of styles and click on Spaced Squares.
- In the palette under Number of blocks Along length, click the arrows to change the number to 1. You’ll see one square block (12”x12”) in the center of the strip.
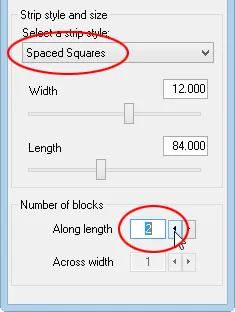
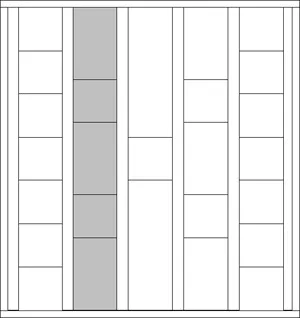
- Click the next wide strip to the right. The palette tells us it is strip 8 of 11.
- In the palette under Select a strip style, click the down arrow and click on Spaced Squares.
- In the palette under Number of blocks Along length, click the arrows to change the number to 2. You’ll see two square blocks evenly spaced in the strip.
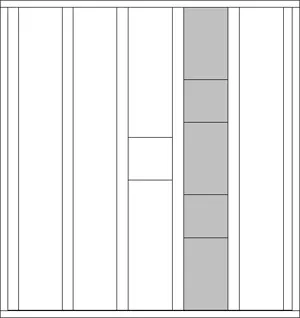
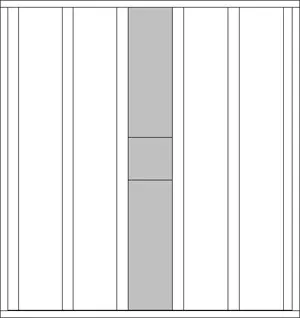
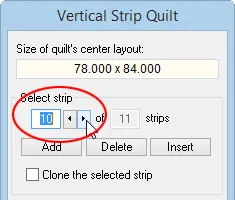
- In the palette under Select strip, click the right arrow to 9 and notice how it moves the gray selected strip on the quilt. Click the arrow again to 10.
- In the palette, click the down arrow to change the style to Spaced Squares. This time leave Number of blocks Along length at 3. Notice that it looks like 7 square blocks and you may have been expecting 3. That’s because now the 4 spaces between the 3 squares are also square. (12 inches multiplied by 7 blocks equals 84”, the length of our strip.)
- Let’s change the style of the other two wide strips. Click strip 2, select Spaced Squares and leave Number of blocks Along length at 3.
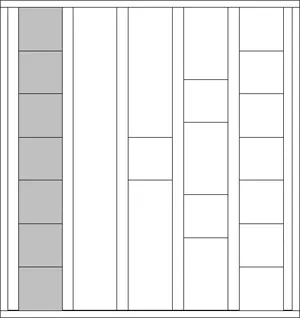
- Click strip 4, select Spaced Squares and change Number of blocks Along length to 2.
Name the Project
Remember that the project name appears at the very top of the EQ Mini window. This project says Untitled. Let’s name this project.
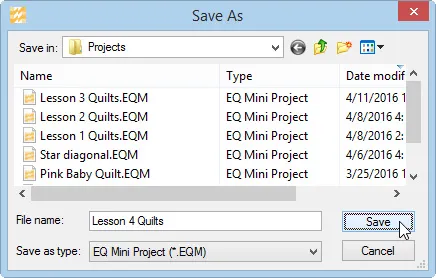
- On the top toolbar click the Save button. The Save As box will display.
- In the File name box type Lesson 4 Quilts.
- Click Save. The box will close. Notice the project name Untitled has been replaced with Lesson 4 Quilts. Now that our project is named, we don’t need to click the Save button anymore. Now we’ll just be clicking Add to Sketchbook.
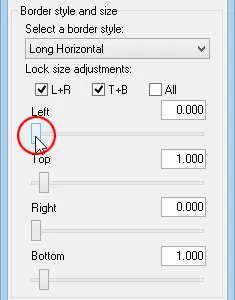
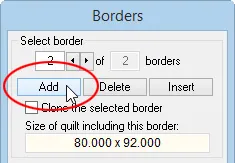
- Click the Edit Borders tab along the top. The Borders palette will display.

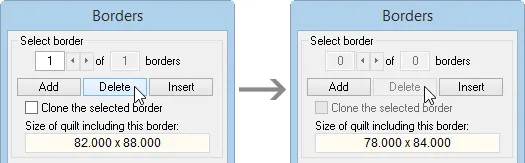
- Notice that the top of the palette says Select border 1 of 1 borders.
- Click the Delete button. Now the palette says border 0 of 0 border and our quilt looks borderless.
- Click the Add button. This adds a 1 inch border of style Long Horizontal.
- Click to uncheck All. Make sure there is a check in front of L+R (Left+Right) and T+B (Top+Bottom).
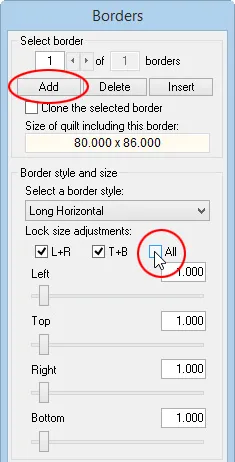
- Let’s eliminate the left and right border. Drag the small rectangle for Left to the left until it is at zero. Notice that the quilt no longer shows a gray border on the left or right. This border is only showing in gray on the top and bottom.
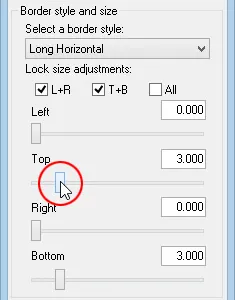
- Let’s widen the top and bottom. Drag the small rectangle for Top to the right until it is at 3.000. Remember that you can click directly on the line to the right or left of the rectangle to make fine adjustments.
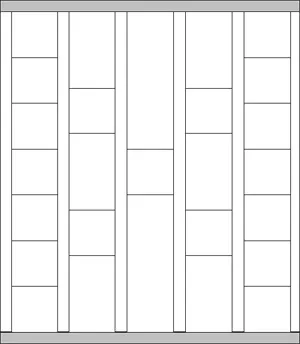
- Click the Add button to add another 1 inch border.
Add Blocks and Color Borders
- Click the Design Quilt tab along the top. First let’s get some blocks to set in the layout.

- Click Libraries > Block Library.
- Click the (+) in front of 03 Foundation Pieced.
- Click on Trees to display the blocks in this style.
- Click Add to Sketchbook repeatedly until all the blocks have been added.
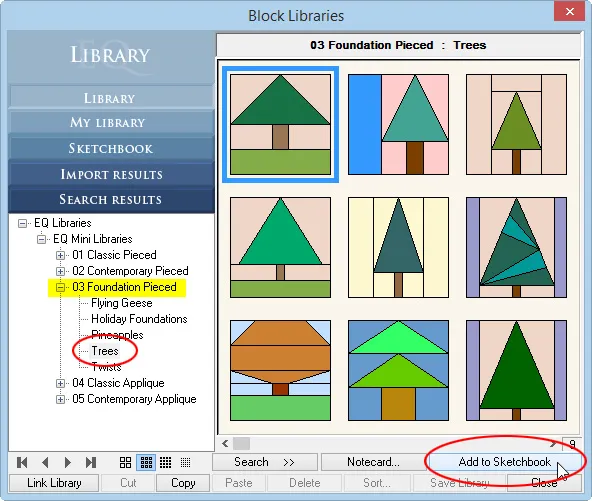
- Click Close. The blocks from the library have been added to our project.
- Click the Set Block tool
 . The palette will show the tree blocks we just added.
 - Have fun clicking the different tree blocks and setting them into the squares and rectangles of your strip quilt layout. Remember that you can replace any block with a new block by clicking directly on the block. There is no need to erase. All the blocks are symmetrical except for Tree with Spacer. If you use this block a lot in your quilt, you may want to use the Flip tool
 on it to create more variety, as shown below.

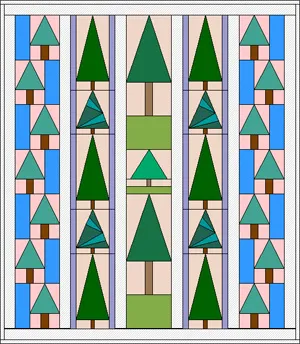
- Click the Paintbrush tool
 on the right-hand toolbar.
 - Click on any green fabric in the palette and click on the narrow strips between the block. Use the same green for the top and bottom 3 inch border.
- Click on a dark green or brown fabric in the palette.
- Hold down your keyboard CTRL key (Command key for Mac users), and click on one of the narrow borders. Holding CTRL (Command) colors the entire border with just one click.
Add to Sketchbook and Name Quilt
- The quilt is complete. Click the Add to Sketchbook button (the red button with the red arrow on the top toolbar
 ) to make this quilt part of your project. Remember: since our project has a name, we simply click Add to Sketchbook to ensure that our quilts are getting added to the project.
 - Click the View Sketchbook button (the red button with the eyeglasses on the top toolbar
 ) to see the Project Sketchbook. The Sketchbook will appear.
 - Click the Quilts section. You will see Unnamed below the quilt.
- Click the Notecard button to display it.
- Type Lesson 4: Quilt 1 on the Name line.
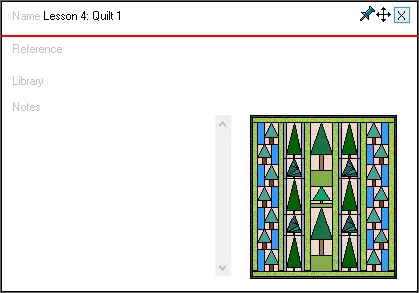
- Click the X in the top-right corner of the notecard to close it. You will see Lesson 4: Quilt 1 below the quilt.

- Click Close in the bottom-right corner of the Sketchbook.
Printing
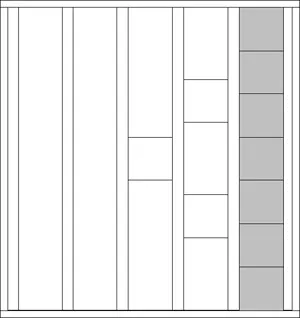
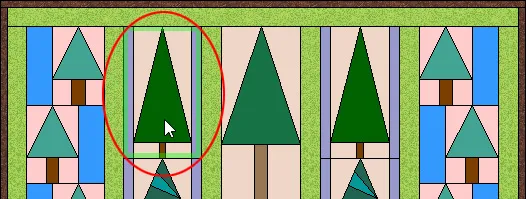
- Click the Select tool
 and click the top block in the second wide strip. It’s rectangular in shape.
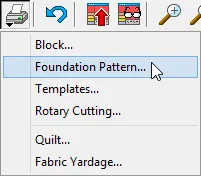
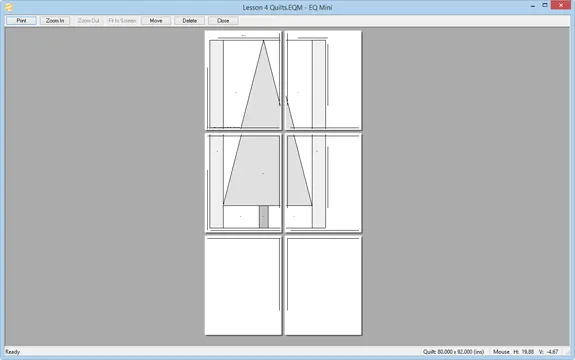
- Click the Print button in the top toolbar and choose Foundation Pattern.
Foundation patterns in EQ Mini will automatically section and number the pattern for you. The first tab in the Print Foundation Pattern box lets you change the Numbering on the pattern.

- The second tab lets you change the Sections of the pattern. Click Sections.

- The final tab lets you change Options for printing. Click Options. You see that the block is 12 inches by 20 inches. Make sure you have Use size from quilt selected.

- Make sure you have checks next to Print numbering, Separate units, Grayscale, Print block name.
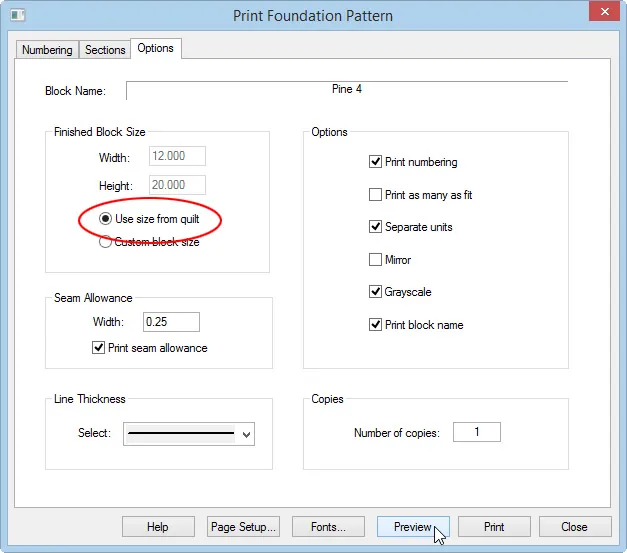
- Click Preview. The preview shows that our printout is 6 pages. Many times you can improve the printout or reduce pages by making different selections in the Print Foundation Pattern box.
- Click Close along the top and the Print Foundation Pattern box will display.
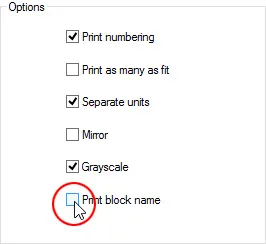
- Click Options.
- Uncheck Print block name.
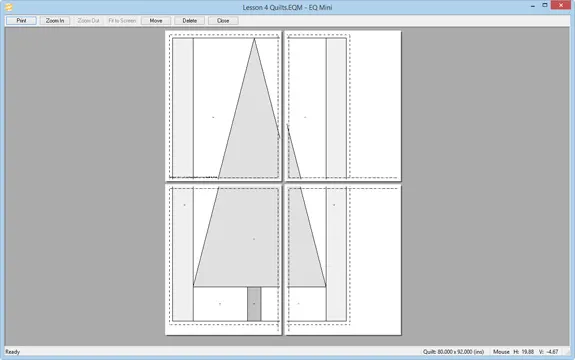
- Click Preview. Now the preview shows only 4 pages because the name is no longer taking up space.
- Click Print.
When blocks are larger than the paper size, they will tile over multiple pages. The dashed lines can be used as a guide for taping the pattern together. With scissors, cut directly on one of the dashed lines and then position that page on top of the other using the dashed line as a guide to match up the pattern. Tape it in place.
- Click the Print button in the top toolbar and choose Quilt.

- Under Printing Style, choose Showing fabrics.
- Click Preview.
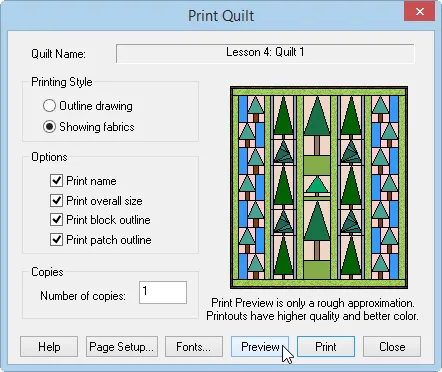
- Click Print at the top of the preview. Now you have a printout of your quilt design.
- Click File > Exit to close EQ Mini.
Congratulations. You’re done with Lesson 4, and you’ve made a sample quilt of each style. By now you should be able to start a new quilt, name the project and save it. Next, we’ll learn how to get previously saved quilts back on the worktable and continue to edit and enhance them.
If you want a little homework…
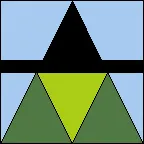
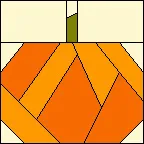
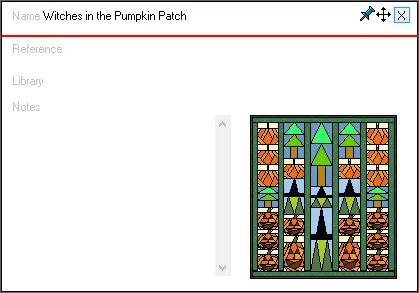
Go back to the Block Library and find these blocks. (All found in 03 Foundation Pieced > Holiday Foundations.)
 |
 |
 |
Set them in the layout to create this quilt.
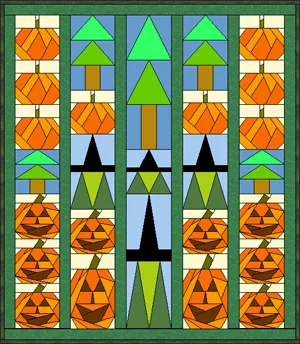
Add the quilt to your Sketchbook. ![]()
Use the Sketchbook Notecard to name the quilt Witches in the Pumpkin Patch.
Print the quilt.


