
How do I make a monogram?
Monogramming Standards
- Here’s a little refresher on proper initials to use.
For a single individual-first name initial, last name initial, middle initial (in that order).
For Susan Ashley Quilter this would be SQA. - For a married woman-first name initial, married last name initial, maiden last name initial (in that order).
For Susan Ashley Smith Quilter this would be SQS. - To incorporate both husband and wife-woman’s first name initial, joint married last name initial, man’s first name initial (in that order).
For Susan Quilter married to Joe Quilter this would be SQJ.
Create the monogram
- Start a design Embroidery design.
- Click the Artwork tab of the Stitching worktable.
- Click the Text tool. This tool is not on by default. You may need to add this tool to the toolbar. See Customize Toolbar for help on adding tools.
Note
You could draw your own text if you wanted. Depending on the number of letters, this could be an overwhelming task. The purpose of the text tool is to create the letters for you so that you don’t have to draw them by hand.
When letters get created by the Text tool, they need to be converted to patches. This is just like using the Ellipse, Rectangle or Brush Stroke tool.
Remember that it’s not necessary to fine-tune size and position using the Text tool. The letters can easily be resized and moved after they have been converted to patches.
- In the Precision Bar, click the down arrow to see a list of the true type fonts on your computer.
Note
Not all the fonts on your computer will be ideal for creating embroidery or machine applique designs. Text that works best will be thick and heavy looking ones like, Arial Black, Gill Sans Ultra Bold, Rockwell Extra Bold, and so on.
Because it’s impossible to test every font face available, you may find that you have some fonts that just will not convert to patches. Simply avoid those fonts.
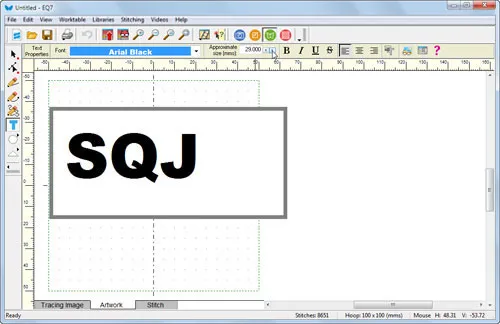
- Select a bold and heavy font from the dropdown list in the Precision Bar.
- Drag a text box the entire size of the hoop. We recommend that you make your text boxes the size of the hoop or even a bit bigger. Once the text is converted to patches, the text box is gone so the size of the original box is not a concern.
- Double click inside the box so that you see the flashing insertion cursor.
- Type your monogram letters.
- Click the arrow buttons for size in the Precision Bar to increase/decrease the size of the letters. Be sure to leave plenty of space to the right of the letters since we’ll be increasing the size of the middle letter. Plus you don’t want to be too close to the edge of the hoop so use caution when resizing.
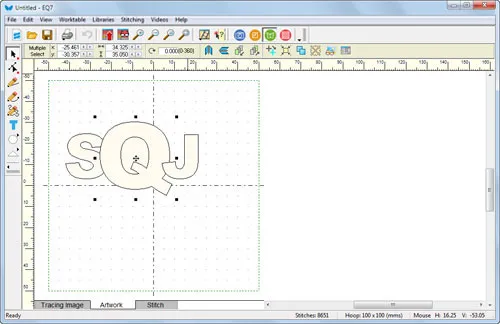
- Position the mouse cursor on the outer edge of the text box and click. This will return the text to “select” mode. The letters will be hollow instead of black.
- Click Convert to patch on the Precision Bar. This will convert the text to patches.
- Click the Pick tool.It’s a very common monogram style to make the middle letter larger. If you want to increase the size of the middle letter a bit, you can.
- Drag a marquee box around the middle letter to select it.
Note
When selecting letters, it’s important to drag a marquee box around the entire letter that you want to select. Since the letter may be made up multiple curves, like the letter B, which is made up of the outer outline and the circles to create the B, clicking on the edge of this letter would not include the extra circles.
- Make sure you have all parts of the middle letter selected and right-click to display the context menu.
- Click Resize.
- Enter 150 for both Horizontal and Vertical.
- Click OK.
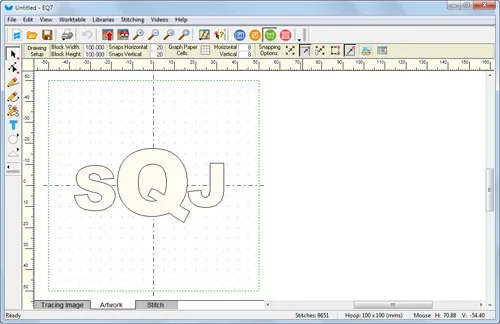
- While the design is still selected, click the Center button on the Precision Bar. This will reposition the letter in the middle of the hoop.
- Drag a marquee box around the first letter and position it keeping enough space between the two letters.
- Drag a marquee box around the last letter and position it as well.
Note
If your overall monogram is too large or too small, select all the letters (EDIT > Select All) and resize larger or smaller as in Steps 6-9.
If you want to be more precise about the positioning of the first and last letter, use the Precision Bar to record the Y value (this is how far down from the top the letter sits) for the first letter. Use this value to position the second letter.
- The artwork is complete. Remember that each letter has fill and edge properties. Finish the design in the usual fashion.


