
The PolyDraw Grids are only available for pieced blocks drawn using the PolyDraw tools. The Eight Point Start grid style is turned on by default, however EQ8 has 5 other grids for you to use to create pieced blocks.
PolyDraw has automatic snapping based on the grid on which you are working. The PolyDraw tools are your only sources for drawing this type of block. With the PolyDraw tools, you’ll notice that with each click, your line will snap to the closest grid point or arc. Click here to learn more about the PolyDraw tools.
You may notice two layer tabs at the bottom of the drawing board: PolyDraw and Applique. The PolyDraw tab is for drawing pieced blocks using the PolyDraw tools, and therefore the patches cannot overlap. The Applique tab is for adding applique patches on top of your piecing. You do not need to do anything on this tab if you do not want to. You can completely ignore it.
![]()
Rectangle Grid
Tool to use: PolyLine
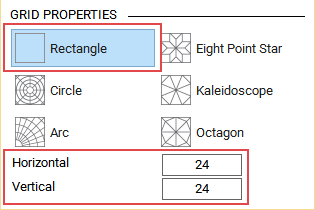
Snap dots are Horizontal and Vertical, indicated by the red lines in the picture.
Minimum Snap Point: 4
Maximum Snap Point: 200
In this example, the grid snap dots are set to 24 and 24. Notice that there are 24 dots horizontally, and 24 dots vertically.

Rotate:
![]()
When using a Rectangle grid, each click of the rotate button will rotate the selected patch by 45 degrees.
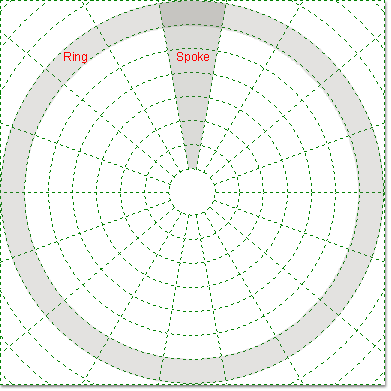
Circle Grid
Tool to use: PolyArc
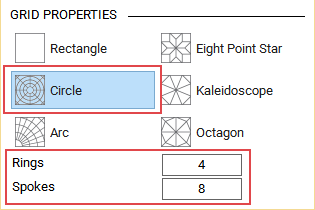
Snap dots are Rings and Spokes, indicated by the shaded areas in the picture.
Minimum Number of Rings and Spokes: 4
Maximum Number of Rings and Spokes: 60
Clicking on the same arc creates an arc. Clicking on a different arc creates a straight line segment.
In this example, the rings and spokes are set to 8 and 18. Notice that there are 8 complete rings, including the center circle all the way out to the shaded ring. There are also 18 spokes surrounding the center circle.
Rotate:
![]()
When using the Circle grid, each click of the rotate button will rotate the selected patch clockwise by a spoke. For example, in this illustration showing 18 spokes, you can click the rotate button 18 times to make a patch rotate completely around the circle back to its original location. If you change the number of spokes to 4, you can click 4 times around the circle, and so on.
Note:
With this grid, use the Clone and Rotate method to make quick, effortless block designs.
- Draw the first patch using the PolyArc tool.
- Click the Clone button in the palette.
- Click the Rotate button in the palette. The patch will rotate to the angle of the adjacent spoke of the grid.
- Grab the 4-arrow crosshair in the center of the newly rotated patch to move it into place. (If the patch is no longer selected, get the Pick tool to select it again before you try to move it.)
- Repeat Steps 2-4 to complete the block.
Arc Grid
Tool to use: PolyArc
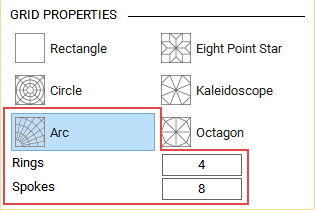
Snap dots are Rings and Spokes, indicated by the shaded areas in the picture.
Minimum Number of Rings and Spokes: 4
Maximum Number of Rings and Spokes: 60
Clicking on the same arc creates an arc. Clicking on a different arc creates a straight line segment.
In this example, the rings and spokes are set to 4 and 6. Notice that there are 4 complete rings, including the center circle all the way out to the shaded ring. There are also 6 spokes surrounding the center circle.
Rotate:
![]()
Each click of the rotate button will rotate the selected patch clockwise by a spoke. For the rotate button to be useful with this grid style, you want your first patch to be drawn on the left side of the grid (since the patches will rotate clockwise). For example, in this illustration showing 6 spokes, you can click the rotate button 5 times to make a patch rotate within the grid.
Note:
With this grid, use the Clone and Rotate method to make quick, effortless block designs.
- Draw the first patch using the PolyArc tool.
- Click the Clone button in the palette.
- Click the Rotate button in the palette. The patch will rotate to the angle of the adjacent spoke of the grid.
- Grab the 4-arrow crosshair in the center of the newly rotated patch to move it into place. (If the patch is no longer selected, get the Pick tool to select it again before you try to move it.)
- Repeat Steps 2-4 to complete the block.
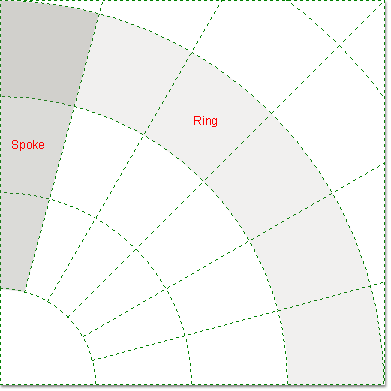
Eight Point Star Grid
Tool to use: PolyLine
Snap dots are in two different dimensions within each of the different polygon shapes. In this grid there are three different polygon shapes.
The two dimensions in each of the three different shapes are illustrated by the red lines. To decipher which dimension is which more easily, change the numbers in the dimension boxes of the Precision Bar to unequal extremes, such as 12 and 4, then return the values to equal numbers.
Minimum Snap Point: 2
Maximum Snap Point: 20
When setting the snap points, it is recommended that you keep the values in both dimensions the same or close to the same.
To count the grid points, find the largest/widest area of each shape and count across from gridline to gridline of that shape. In this example, the grid snap dimensions are set to 4 and 4. Notice that there are 4 dots for each dimension shown. The first and last dots fall on the grid lines, so don’t forget to count those.
Rotate:
![]()
When using the Eight Point Star grid, each click of the rotate button will rotate the selected patch by 45 degrees.
Note:
With this grid, use the Clone and Rotate method to make quick, effortless block designs.
- Draw the first patch (one of the star diamonds) using the PolyLine tool.
- Click the Clone button in the palette.
- Click the Rotate button in the palette. The patch will rotate to the angle of the adjacent star diamond of the grid.
- Grab the 4-arrow crosshair in the center of the newly rotated patch to move it into place. (If the patch is no longer selected, get the Pick tool to select it again before you try to move it.)
- Repeat Steps 2-4 to complete the star diamond patches.
- Draw one of the corner squares, clone and move into position. Repeat until all square patches are completed.
- Draw one of the side triangles, clone and rotate multiple times until they are in the correct rotation. Repeat until all triangle patches are completed.
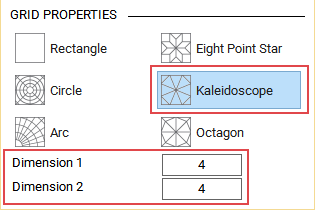
Kaleidoscope Grid
Tool to use: PolyLine
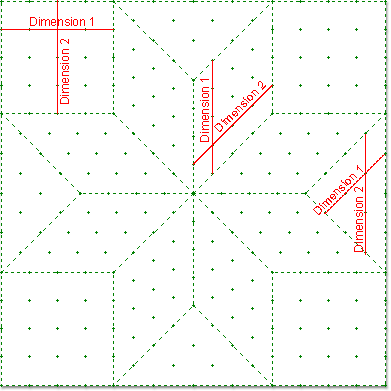
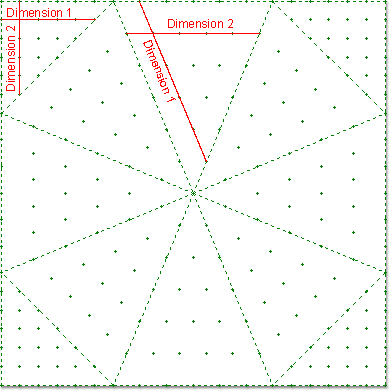
Snap dots are in two different dimensions within each of the different polygon shapes.
The two dimensions in each of the two different shapes are illustrated by the red lines. To decipher which dimension is which more easily, change the numbers in the dimension boxes of the Precision Bar to unequal extremes, such as 12 and 4, then return the values to equal numbers.
Minimum Snap Point: 2
Maximum Snap Point: 20
When setting the snap points, it is recommended that you keep the values in both dimensions the same or close to the same.
To count the grid points, find the largest/widest area of each shape and count across from gridline to gridline of that shape. In this example, the grid snap dimensions are set to 6 and 6. Notice that there are 6 dots for each dimension shown. The first and last dots fall on the grid lines, so don’t forget to count those.
Rotate:
![]()
When using the Kaleidoscope grid, each click of the rotate button will rotate the selected patch by 45 degrees.
Note:
With this grid, use the Clone and Rotate method to make quick, effortless block designs.
- Draw the first patch (one of the center triangles) using the PolyLine tool.
- Click the Clone button in the palette.
- Click the Rotate in the palette. The patch will rotate to the angle of the adjacent triangle of the grid.
- Grab the 4-arrow crosshair in the center of the newly rotated patch to move it into place. (If the patch is no longer selected, get the Pick tool to select it again before you try to move it.)
- Repeat Steps 2-4 to complete the center triangle patches.
- Draw one of the corner triangles, clone and rotate multiple times until they are in the correct rotation. Repeat until all triangle patches are completed.
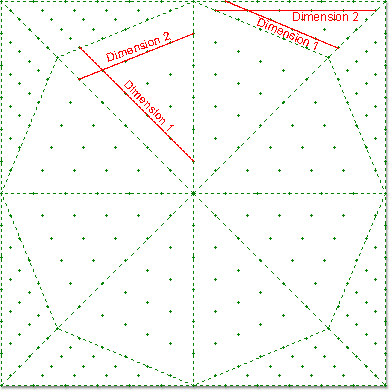
Octagon Grid
Tool to use: PolyLine
Snap dots are in two different dimensions within each of the different polygon shapes.
The two dimensions in each of the different shapes are illustrated by the red lines. To decipher which dimension is which more easily, change the numbers in the dimension boxes of the Precision Bar to unequal extremes, such as 12 and 4, then return the values to equal numbers.
Minimum Snap Point: 2
Maximum Snap Point: 20
When setting the snap points, it is recommended that you keep the values in both dimensions the same or close to the same.
To count the grid points, find the largest/widest area of each shape and count across from gridline to gridline of that shape. In this example, the grid snap dimensions are set to 6 and 6. Notice that there are 6 dots for each dimension shown. The first and last dots fall on the grid lines, so don’t forget to count those.
Rotate:
![]()
When using the Octagon grid, each click of the rotate button will rotate the selected patch by 45 degrees.
Note:
With this grid, use the Clone and Rotate method to make quick, effortless block designs.
- Draw the first patch (one of the center triangles) using the PolyLine tool.
- Click the Clone button in the palette.
- Click the Rotate in the palette. The patch will rotate to the angle of the adjacent triangle of the grid.
- Grab the 4-arrow crosshair in the center of the newly rotated patch to move it into place. (If the patch is no longer selected, get the Pick tool to select it again before you try to move it.)
- Repeat Steps 2-4 to complete the center triangle patches.
- Draw one of the corner triangles, clone and rotate multiple times until they are in the correct rotation. Repeat until all triangle patches are completed.


