
How do I prepare my image to use on my quilt?
Follow the instructions below if you plan to print your photo onto printable photo fabric directly from EQ7. The file sizes of these images will be large, which could slow down the program.
- Click the Work on Image button so that you’re working on the Image worktable.
- Click IMAGE > Import image.
- Select a photo and click Open.
- Click Add to Sketchbook to save the original version of your image. (optional)
- Click IMAGE > Image Resize. You’ll want the resolution to be at least 100-150ppi for printing onto fabric.
- To increase the resolution, click the Resampling drop-down and select either Linear and averaging or Bicubic and averaging. Then change the resolution to 150. Click OK.
- If your resolution is high (200 or higher), but you notice the width and height are small, increase the width and height and leave the resolution as is. Make the width and height larger than what your final image should be (example: If your final image will be 10″ x 7″, then change the dimensions to 12″ x 8″. This gives you plenty of room for cropping and adding seam allowance.
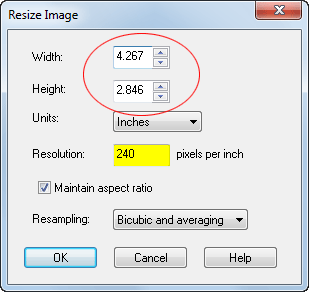
This image’s resolution needs to be increased to 150ppi. Select Bicubic and averaging and change the resolution to 150. 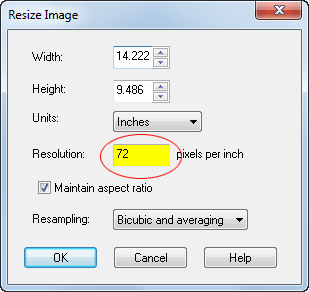
This image’s resolution is high, but the dimensions are too small to get a 10″x7″ print. Select Bicubic and averaging, leave Maintain aspect ratio checked, and change the dimensions to a larger size than your finished size (example: 12″ x 8″). - Click the Crop tool. Please note before cropping! To accommodate for shrinkage and seam allowance, add 0.5″ to the width and height before cropping.
- On the Precision Bar, highlight the number for Width and enter your new size (10.5 for a final width of 10″). Do the same for Height (7.5 for a final height of 7″).

- Hover your cursor inside the crop box on the image and click and drag to move the the box on your image so it’s in the best position.
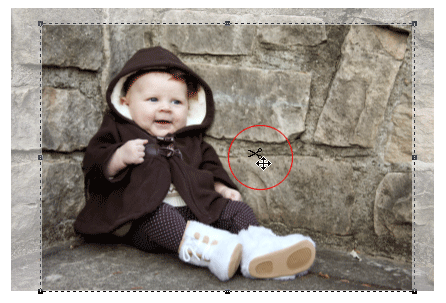
- When you are satisfied with the crop selection, click the Apply button on the Precision Bar, click Enter on your keyboard, or double-click inside the crop box.
- Click Add to Sketchbook.
- Click IMAGE > Image Resize. Check the dimensions of your photo to see if you need to make any changes before printing your final photo.
- Click FILE > Print > Photo Layout.
- Scroll through the photos on the right column until you find the photo you want to print.
- Click, hold and drag the photo to the photo layout.
- Use the positioning tools to get the best use of the sheet of fabric. If your photo is horizontal, like the example shown, use the Rotate Left button or the Rotate Right button in the Photo Layout window to rotate the photo to fit on the page.
- Click Print.
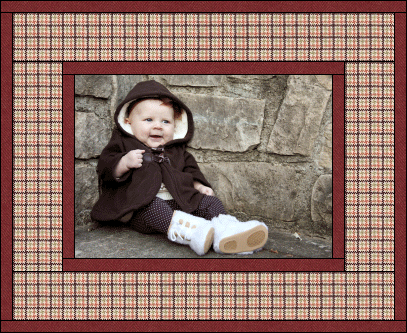
This photo was prepared for printing at 10 “x 7” on printable photo fabric
Note:
- Once you have your final photo ready for prining, you can switch to the Quilt worktable and design your quilt using the actual photo. Be sure to set your quilt up for the dimensions you’ll be printing the photo.
- When printing on fabric, it’s recommended that you account for a 1/4″ shrinkage. It’s also recommended that you include a little more of your photo than necessary when you are cropping. This will give you a bit of a seam allowance so you don’t see white when trying to sew the photo into a quilt. Adding about a 1/2″ total to the width and height should be enough to accommodate both shrinkage and seam allowance.
- In Image Options, there’s a setting for Image Quality when adding to the Sketchbook. The default setting is 70 which will not degrade your image too much. However, if you lower this setting (to save on file size), each time you add a photo to the Sketchbook, your image will degrade and you’ll start to see muddy colors and pixelated parts of your image. So if you know you will be printing onto photo fabric, keep the setting at 70 or higher.


