
The Quilt Worktable Options dialog lets you customize the settings for the Quilt Worktable. You can access these options by clicking on the Worktable Options button ![]() on the main toolbar while on the Quilt Worktable.
on the main toolbar while on the Quilt Worktable.
Tool Options
Starting New Quilts
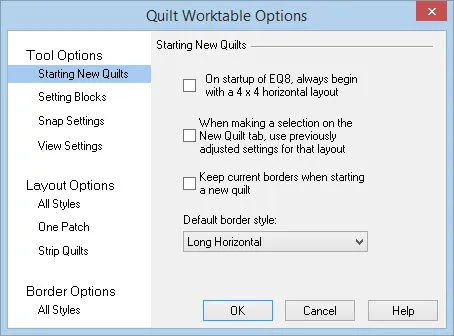
Use this section of the Quilt Worktable Options dialog to turn the Startup features of the Quilt worktable on and off. Uncheck whichever item you want to turn off.
- On startup of EQ8, always begin with a 4 x 4 horizontal layout option will always give this layout when you go to the Quilt Worktable for the first time. If this option is unchecked, EQ8 will remember the last quilt layout used when EQ8 was closed. This will be the quilt layout that is displayed when you open the program the next time.
- When making a selection on the New Quilt tab, use previously adjusted settings for that layout option remembers the settings for each different layout style separately. In other words, if the last on-point layout had 4 blocks horizontally and 6 blocks vertically, the next time a new on-point quilt is started, it will be 4 x 6.
- Check Keep current borders when starting a new quilt so that when you choose a new quilt layout, the border settings of the current quilt will remain with the new quilt layout.
- Choose the Default border style by clicking the drop-down menu to display the options. This will be the border style that will be displayed on the Quilt worktable each time you open EQ8.
Setting Blocks
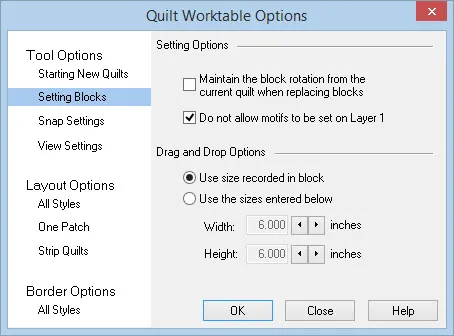
Use this section to adjust how blocks are set onto quilts.
- Check Maintain the block rotation from the current quilt when replacing blocks so that when you click to replace a block, the block will maintain the previous block’s rotation. Uncheck this option to let the blocks set without any rotation.
- Check Do not allow motifs to be set on Layer 1 so your motifs will not accidentally be set on Layer 1. This option is turned on by default.
- Select Use size recorded in block to have blocks set at the size they were drawn when set on Layers 2, 3, and Custom Set quilts when using the Drag and Drop method for setting blocks.
- Select Use the sizes entered below to use your own custom settings for block sizes when using the Drag and Drop method.
Snap Settings
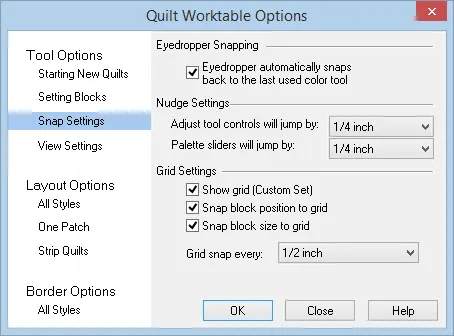
- Eyedropper Snapping: Check this option to eliminate time spent clicking extra buttons. Whenever the Eyedropper tool is used, the last used color tool will become selected.
- Adjust tool controls will jump by: This setting determines the incremental change in values for Width, Height, X-axis, and Y-axis when clicking the up/down arrow keys in the Adjust palette. Allowable values are from 1/4″ to 1/32″.
- Palette sliders will jump by: This setting determines the incremental change in values when you click directly on the slider bars in the Layout palette and Borders palette. Allowable values are from 1/4″ to 1/32″.
- Check Show grid (Custom Set) to display the grid lines on a Custom Set layout.
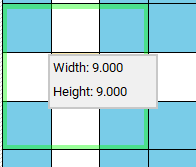
- Check Snap block position to grid to have your block, motif, stencil, embellishment, or photo set on an increment of your Grid snap every setting. For example, if your grid setting is every 1/4″, then your block would fall into place, in positions such as 12.250, 12.500, 12.750 inches when released (you could not place it in a position like 12.625).
- Check Snap block size to grid to have your block, motif, stencil, embellishment, or photo size itself in an increment of your Grid snap every setting when you release the handle. For example, if your grid setting is every 1/4″, then your block size would adjust to sizes such as 12.250, 12.500, 12.750 inches when you release the handle (you could not set it to a size like 12.625).
- Grid snap every is the increment in which your Snap block position to grid and Snap block size to grid would move. Click the drop-down menu to change this option. Allowable values are from 1″ to 1/32″.
View Settings
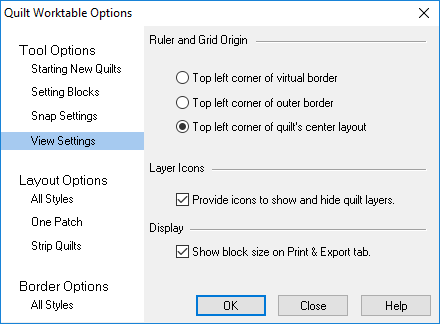
- Select Top left corner of virtual border to place the zero mark at the corner of the virtual border. The virtual border is the area beyond the last border of your quilt. This area is for blocks that hang over the edge of the quilt on Layer 2. It is also necessary for One Patch quilts that are borderless. Since the One Patch quilts create a scalloped edge when they become borderless, this area is needed to accommodate the size of the patches that get dropped out.
- Select Top left corner of outer border to place the zero mark at the corner of the outer border.
- Select Top left corner of quilt’s center layout to place the zero mark at the corner of the quilt’s center.
- Layer Icons: Put a check next to Provide icons to show and hide quilt layers to place an Eye icon on the layer tabs. When the Eye icon is clicked, it will turn the current layer on or off. You’ll know the layer is off when there’s a slash through the closed eye and you’ll know when it’s on when the eye is open.

- Display: Put a check next to Show block size on Print & Export tab to display the dimensions of block sizes in the quilt when you click on the block. Uncheck to turn off this option.
Layout Options
All Styles
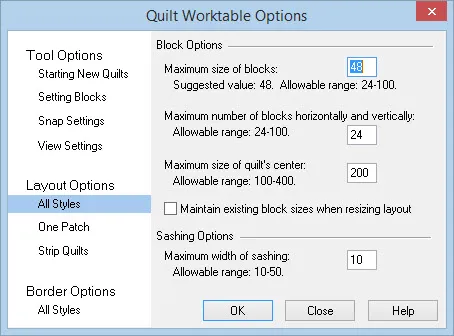
Maximum size of blocks lets you adjust the maximum size for a block in a quilt layout. This number will affect the sensitivity of the scrollbars on the layout tab. In other words, if the maximum size is large, it will take very small movements of the scrollbar to adjust the size. EQ8’s suggested value is 48, but the allowable values are from 24-100.
Maximum number of blocks horizontally and vertically lets you adjust the number of blocks allowed in a quilt layout, including in any of the Blocks border styles. Allowable range is 24-100.
Maximum size of quilt’s center sets the maximum size allowed for the quilt center. Allowable range is from 100-400.
Check Maintain existing block sizes when resizing layout if you do not want the content of layers resized when resizing your quilt. For example, if this option is unchecked, a 12″ x 12″ embroidery design will scale down in size when the quilt is changed to a smaller size, keeping the contents proportional.
Sashing Options: The Maximum width of sashing lets you adjust the maximum width for sashing. This number will affect the sensitivity of the scrollbars on the layout tab. In other words, if the maximum width is large, it will take very small movements of the scrollbar to adjust the size. EQ8’s suggested value is 10, but the allowable range is from 10-50.
One Patch
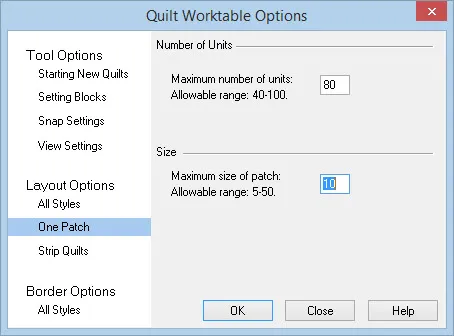
Number of Units: Enter the maximum number of units you’d like for One patch quilts. Allowable range is 40-100.
Size: Enter a size for the maximum size of a patch in One patch quilts. Allowable range is 5-50.
Strip Quilts
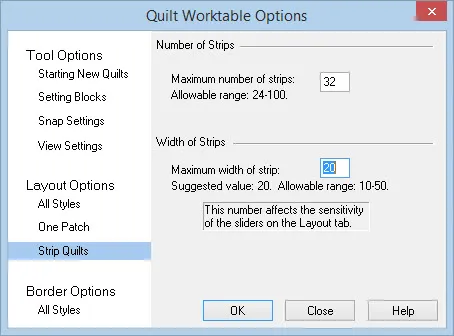
Number of Strips: Enter the maximum number of strips you’d like for strip quilts. Allowable range is 24-100.
Width of Strips: Enter the maximum width you’d like for each strip in strip quilts. Suggested value is 20. Allowable range is 10-50.
Border Options
All Styles
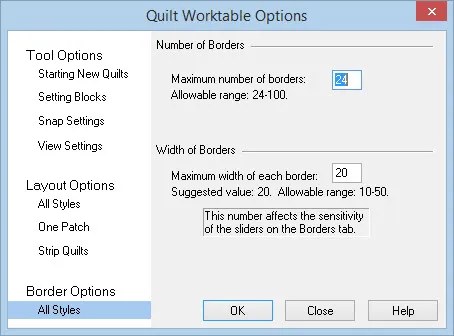
Number of Borders: Enter the maximum number of borders you’d like available for all border styles. Allowable range is 24-100.
Width of Borders: Enter the maximum width you’d like for the borders. Suggested value is 20. Allowable range is 10-50.


