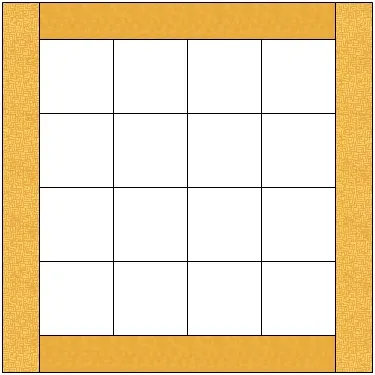
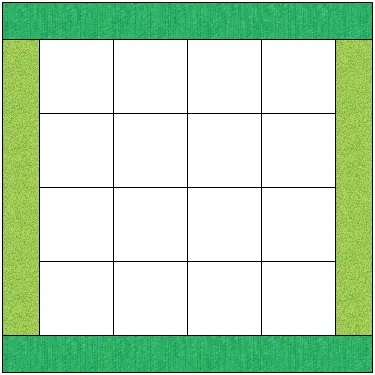
Mitered Border
This border style has long strips of fabric with mitered corners. You cannot place pieced blocks in mitered borders. You can adjust the size of each side independently.
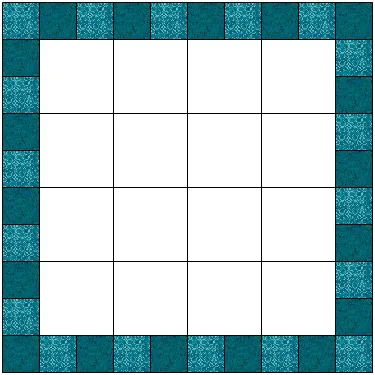
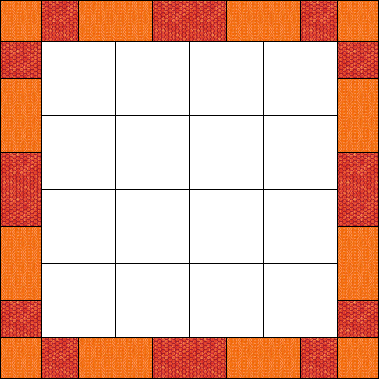
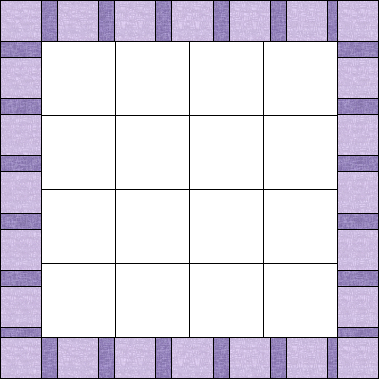
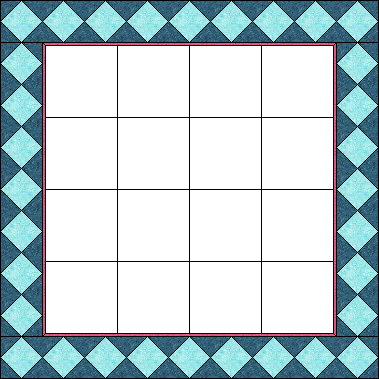
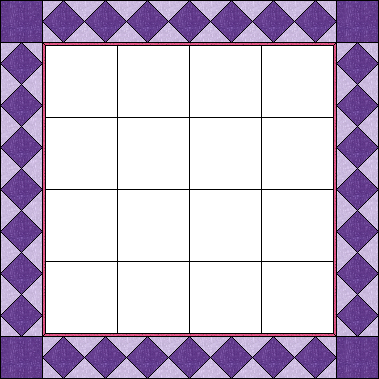
Corner Blocks
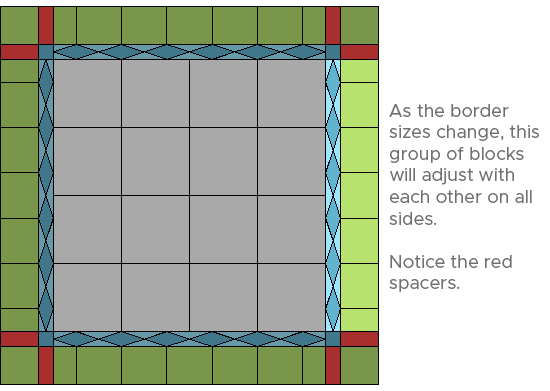
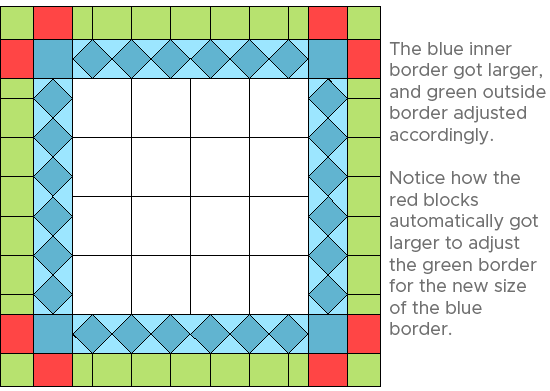
This border style has blocks in each corner with long strips along each side of the quilt. You can place blocks in each location of this border and adjust the size of each side independently.
Long Vertical
This border style has long strips vertically with shorter horizontal strips. You can place blocks in each strip and adjust the size of each side independently.
Long Horizontal
This border style has long strips horizontally with shorter vertical strips. You can place blocks in each strip and adjust the size of each side independently. This is the default border style for EQ8 quilt layouts.
Blocks
This border style consists of rectangular blocks. Use the arrows to set the number of blocks. Do not include corner blocks in the number you enter. You can place blocks in each location of this border and adjust the size of each side independently.
Half Drop Blocks
This border style divides the border strips into rectangular blocks with each end of the strip showing half a block. Use the arrows to set the number of blocks. The two half blocks are counted as one. You can place blocks in each location of this border and adjust the size of each side independently.
Spaced Squares
This border style divides the border strips with equally spaced squares. Use the arrows to set the number of squares. The distance between the squares will vary as the number of squares is adjusted. As the number of squares increases, the squares will eventually become rectangles. You can place blocks in each location of this border and adjust the size of each side independently.
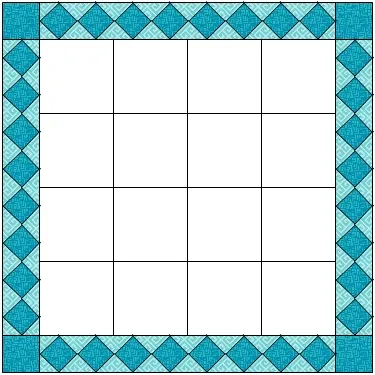
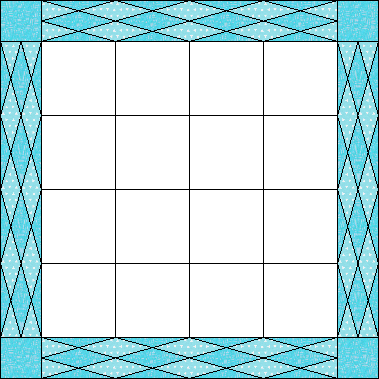
Diamonds
This border style consists of diamond-shaped blocks. Select the number of blocks you want horizontally and vertically using the numeric entries at the bottom of the palette. Do not include corner blocks in the number you enter. The corner blocks will not be diamonds. You can place blocks in each location of this border and adjust the size of each side independently.
Half Drop Diamonds
This border style divides the border strips into diamonds with each end of the strip showing half a diamond. Use the arrows to set the number of diamonds. The two half diamonds are counted as one. You can place blocks in each location of this border and adjust the size of each side independently. See Printing Clipped Blocks >
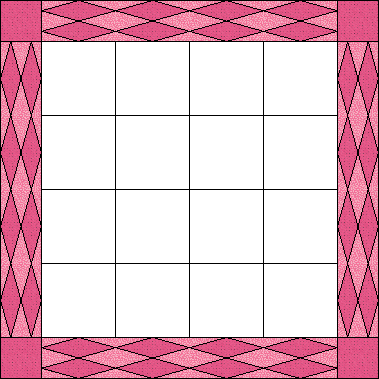
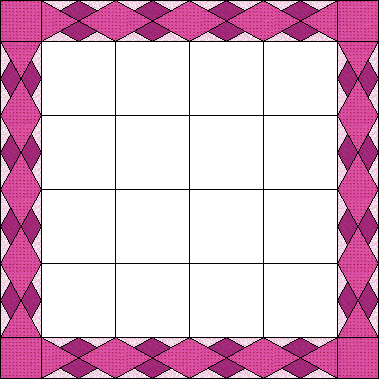
Double Diamonds
This border style divides the border strips into two rows of diamonds. Use the arrows to set the number of diamonds. You can place blocks in each location of this border and adjust the size of each side independently. See Printing Clipped Blocks >
Half Drop Double Diamonds
This border style divides the border strips into two rows of diamonds with each end of the strip showing half diamonds. Use the arrows to set the number of diamonds. The two half diamonds are counted as one. You can place blocks in each location of this border and adjust the size of each side independently. See Printing Clipped Blocks >
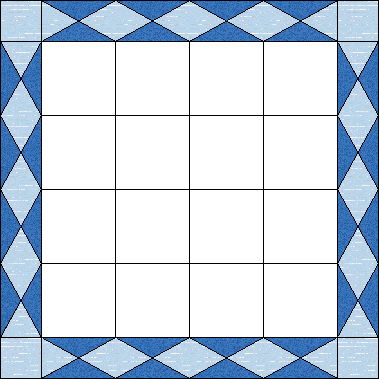
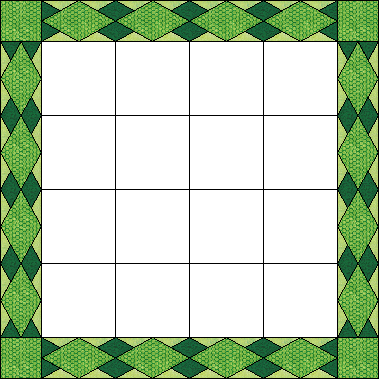
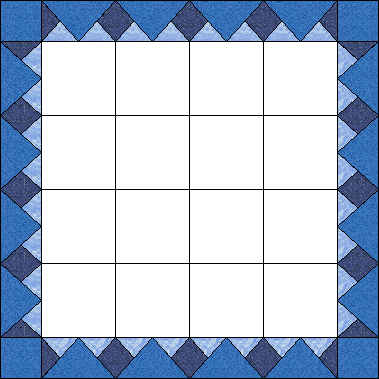
Big & Little Diamonds
This border style divides the border strips into big diamonds with two small diamonds between the big ones. Use the arrows to set the number of big diamonds. You can place blocks in each location of this border and adjust the size of each side independently. See Printing Clipped Blocks >
Half Drop Big & Little Diamonds
This border style divides the border strips into big diamonds with two small diamonds between the big ones. Each end shows half diamonds. Use the arrows to set the number of big diamonds. The two half diamonds are counted as one. You can place blocks in each location of this border and adjust the size of each side independently. See Printing Clipped Blocks >
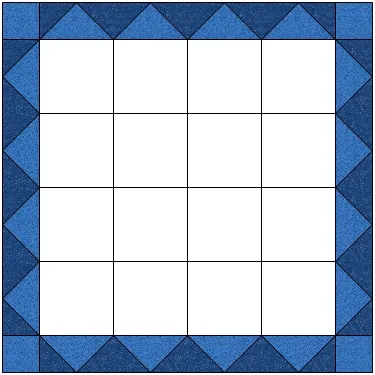
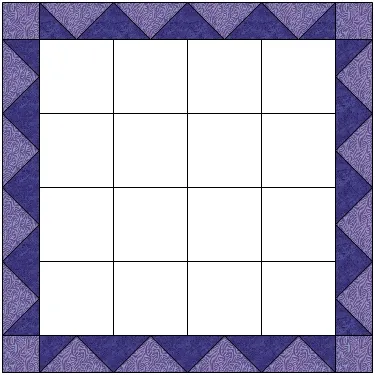
Points Out
This border style consists of triangles whose base sits on the inner edge of the quilt. Select the number of triangles you want using both entries at the bottom of the palette. Do not include corner blocks in the number you enter. The corner blocks will not be triangles. You can place blocks in each location of this border and adjust the size of each side independently.
The only difference between this style and the Points In style is the way the corners meet. See Printing Clipped Blocks >
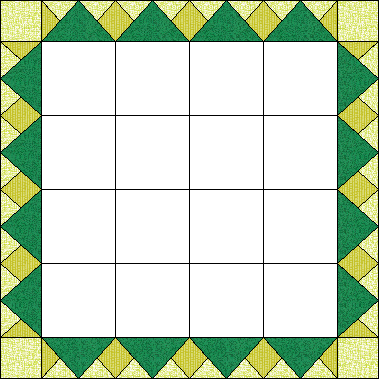
Points In
This border style consists of triangles whose base sits on the outer edge of the quilt. Select the number of triangles you want using both entries at the bottom of the palette. Do not include corner blocks in the number you enter. The corner blocks will not be triangles. You can place blocks in each location of this border and adjust the size of each side independently.
The only difference between this style and the Points Out style is the way the corners meet. See Printing Clipped Blocks >
Big & Little Points Out
This border style consists of big triangles whose base sits on the inner edge of the quilt with smaller points between the big ones. Select the number of big triangles you want using both entries at the bottom of the palette. Do not include corner blocks in the number you enter. You can place blocks in each location of this border and adjust the size of each side independently.
The only difference between this style and the Big & Little Points In style is the way the corners meet. See Printing Clipped Blocks >
Big & Little Points In
This border style consists of big triangles whose base sits on the outer edge of the quilt with smaller points between the big ones. Select the number of big triangles you want using both entries at the bottom of the palette. Do not include corner blocks in the number you enter. You can place blocks in each location of this border and adjust the size of each side independently.
The only difference between this style and the Big & Little Points Out style is the way the corners meet. See Printing Clipped Blocks >
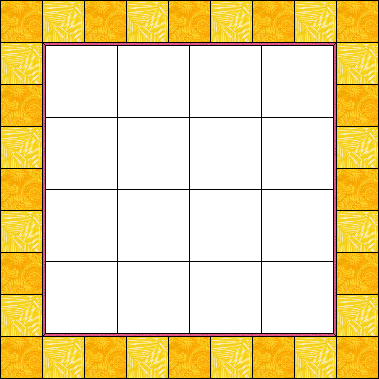
Tile Squares
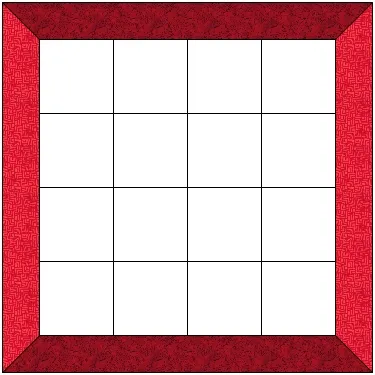
This border style consists of perfectly square blocks around the quilt. This border size is completely determined by the number of blocks along a horizontal side. The minimum number of blocks in the horizontal direction is three. This number does not include the corners so when the clicker is on 3, you see 5 blocks across the top and bottom of the quilt. Remember that the corners are never included in the count. When you choose this style, the sliders for changing the size of the border disable along with the number of vertical blocks in the border. Use the horizontal entry at the bottom of the palette to enter the number of blocks horizontally that you want. EQ then calculates for you the size that is required, and how many blocks will be needed to fit along a vertical side.
Many times the border requires a spacer border (red border in the example below) so that the horizontal and vertical sides can both be divided evenly by a single square. EQ calculates the minimum possible spacer, using quarter inch increments for the size. The spacer border must be mitered. It is not counted as a separate border and the size of the spacer is included with the overall size of the border.
Because of the calculating required by EQ to determine this style, sometimes adding or deleting one block can cause dramatic changes in the overall look of your quilt. You may feel that you have less control when using this style but it is necessary to ensure the blocks in the border are perfectly square. You can place blocks in each location of this border.
Tile On Point
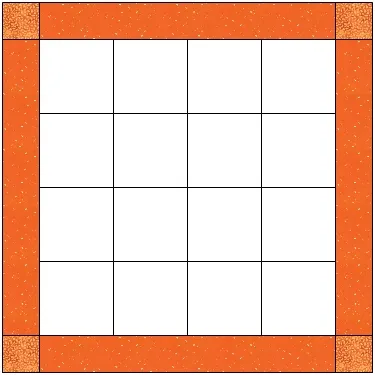
This border style consists of on-point square blocks around the quilt. This border size is completely determined by the number of blocks along a horizontal side. The minimum number of blocks in the horizontal direction is three. This number does not include the corners so when the clicker is on 3, you see 5 blocks across the top and bottom of the quilt. Remember that the corners are never included in the count. When you choose this style, the sliders for changing the size of the border disable along with the number of vertical blocks in the border. Use the horizontal entry at the bottom of the palette to enter the number of blocks horizontally that you want.
EQ then calculates for you the size that is required, and how many blocks will be needed to fit along a vertical side. Many times the border requires a spacer border (red border in the example below) so that the horizontal and vertical sides can both be divided evenly by a single square. EQ calculates the minimum possible spacer, using quarter inch increments for the size. The spacer border must be mitered. It is not counted as a separate border and the size of the spacer is included with the overall size of the border.
Because of the calculating required by EQ to determine this style, sometimes adding or deleting one block can cause dramatic changes in the overall look of your quilt. You may feel that you have less control when using this style but it is necessary to ensure the on-point blocks in the border are perfectly square. You can place blocks in each location of this border.
Tile On Point Corners
This border style consists of on-point square blocks around the quilt with plain corners. This border size is completely determined by the number of blocks along a horizontal side. The minimum number of blocks in the horizontal direction is three. This number does not include the corners so when the clicker is on 3, you see 3 on-point blocks across the top and bottom of the quilt with plain corner blocks. Remember that the corners are never included in the count. When you choose this style, the sliders for changing the size of the border disable along with the number of vertical blocks in the border. Use the horizontal entry at the bottom of the palette to enter the number of blocks horizontally that you want.
EQ then calculates for you the size that is required, and how many blocks will be needed to fit along a vertical side. Many times the border requires a spacer border (red border in the example below) so that the horizontal and vertical sides can both be divided evenly by a single square. EQ calculates the minimum possible spacer, using quarter inch increments for the size. The spacer border must be mitered. It is not counted as a separate border and the size of the spacer is included with the overall size of the border.
Because of the calculating required by EQ to determine this style, sometimes adding or deleting one block can cause dramatic changes in the overall look of your quilt. You may feel that you have less control when using this style, but it is necessary to ensure the on-point blocks in the border are perfectly square. You can place blocks in each location of this border.
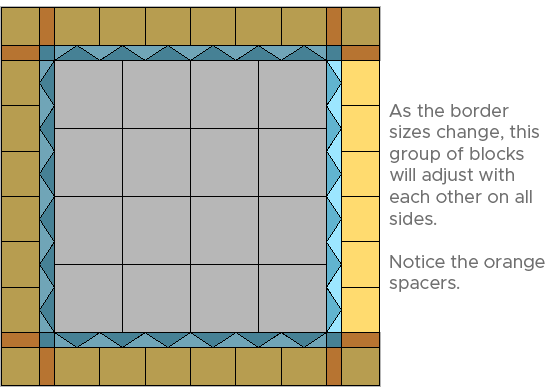
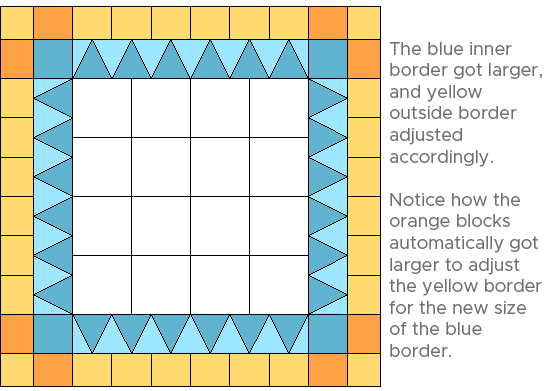
Blocks Aligned Inside
This border style consists of rectangular blocks. As its title indicates, it will align with a border inside of it, so it is best understood when it is added after an existing border with blocks. The blocks of an aligned border can be “lined up” with the blocks in the inner adjacent border.
Use the arrows to set the number of blocks. Do not include corner blocks in the number you enter. This border style looks best when the number of blocks matches (or is a multiple of) the number of blocks in the inner adjacent border. You can place blocks in each location of this border and adjust the width of each border side independently.
Whereas a Blocks border takes the length of the outside edge and divides this by the number of blocks you enter, a Blocks Aligned Inside border takes the length of the inside edge of the previous border and divides this by the number of blocks you enter.
In the example below, the blue border is a Points Out border and the yellow is Blocks Aligned Inside.
Note:
You will not see a difference between Blocks and Blocks Aligned Inside if it is the first border in a quilt.
Half Drop Blocks Aligned
This border style divides the border strips into rectangular blocks with each end of the border strip showing half a block. It’s as if the block has been ‘dropped’ by half a block. The two half blocks are counted as one. The blocks of an aligned border can be “lined up” with the blocks in the inner adjacent border. They “fit” together, so it is best understood when this style is added after an existing border with blocks.
Use the arrows at the bottom of the palette to set the number of blocks. Do not include corner blocks in the number you enter. This border style looks best when the number of blocks matches (or is a multiple of) the number of blocks in the inner adjacent border. You can place blocks in each location of this border and adjust the width of each side of the border independently.
Whereas a Half Drop Blocks border takes the length of the outside edge, divides this by the number of blocks you enter, and shows a half of the last block at either end, a Half Drop Blocks Aligned border takes the length of the inside edge of the previous border and does the same calculation.
You will not see a difference between Half Drop Blocks and Half Drop Blocks Aligned if it is the first border in a quilt.
In the example below, the blue border is a Diamonds border and the green is Half Drop Blocks Aligned Inside.