

The Serendipity tools allow you to magically turn any block into a new original block.
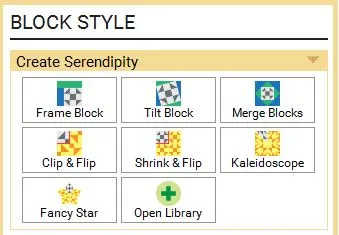
To access the Serendipity tools:
- Click Block Worktable (if you aren’t already there)
- Click Block > Serendipity and choose one of the seven options described below.

Frame Block
This Serendipity feature on the Block worktable lets you take Sketchbook blocks and add a predesigned frame around that block. You can choose from dozens of different frames which, when used with the right blocks, can create amazing new block designs.

- Add your favorite block designs to your Sketchbook. You can use Library blocks or your own block designs.
- On the Block worktable, click New Block > Create Serendipity > Frame Block.
- On the right side of the dialog, you’ll see your Sketchbook blocks. Scroll through the list to find the block you want to use. Click to select it.
- On the left side of the dialog, you’ll see the frame options. Scroll through the list to find the frame that works well with the block you chose. Click to select it.
- Use the preview to see what the combination will look like together. When you find the best combination, click Add to Sketchbook. Your new block will be added to the end of the list in the Blocks section of the Sketchbook.
- Continue to create blocks with frames in the same manner, or click Close to close the dialog.
Notes:
- If your Sketchbook block is designed and/or colored asymmetrically, click on the block in the preview to rotate the design in the frame. Each click rotates the block 90 degrees. You will not notice a change with symmetrical designs.
- To view different blocks in different frames more quickly, use the keyboard up and down arrow keys to scroll through the list of blocks and frames.
- When you find the combination that you want, use the coloring arrows to change the colorings that are displayed before adding the block to the Sketchbook.
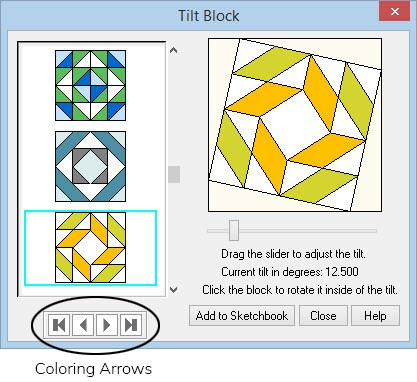
Tilt Block
This Serendipity feature on the Block worktable lets you tilt any Sketchbook block at any angle between 0 and 90 degrees.
- Add your favorite block designs to your Sketchbook. You can use Library blocks or your own block designs.
- On the Block worktable, click New Block > Create Serendipity > Tilt Block.
- On the left side of the dialog, you’ll see your Sketchbook blocks. Scroll through the list to find the block you want to use. Click to select it.
- Click and hold the left mouse button on the slider below the block preview. Drag the slider left or right to set the tilt angle.
- Use the preview to see what the block will look like. When you find the best design, click Add to Sketchbook. Your new block will be added to the end of the list in the Blocks section of the Sketchbook.
- Continue to create new, tilted blocks the same manner, or click Close to close the dialog.
Notes:
To view different blocks more quickly, use the keyboard up and down arrow keys to scroll through the list.
When you find the block and tilt angle that you want, use the coloring arrows to change the colorings that are displayed before adding the block to the Sketchbook.
Merge Blocks
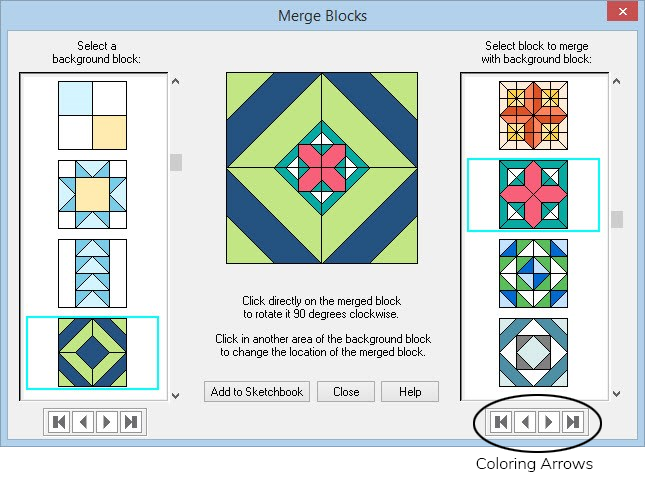
This Serendipity feature on the Block worktable lets you merge Sketchbook blocks together to create a whole new block. Only certain blocks can act as the background block, but any block in your Sketchbook can be merged with that background block.
- Add your favorite block designs to your Sketchbook. You can use Library blocks or your own block designs.
- On the Block worktable, click New Block > Create Serendipity > Merge Blocks.
- On the left side of the dialog, you’ll see the background block options. Only certain blocks from your Sketchbook can be used as background blocks. See below for the block requirements. Scroll through the list to find the background block you want to use. Click to select it. On the right side of the dialog, you’ll see all of your Sketchbook blocks. Scroll through the list to find the block that works well with the background you chose. Click to select it. If you don’t like where the block is being placed on the background block, click in a different patch on the preview to place the block in that patch.
- Use the preview to see what the combination will look like together. When you find the best combination, click Add to Sketchbook. Your new block will be added to the end of the list in the Blocks section of the Sketchbook.
- Continue to create merged blocks in the same manner, or click Close to close the dialog.
Background Block Requirements:
When you open the Merge Blocks dialog, EQ will evaluate each block in the Sketchbook and decide if it is suitable for a background block. You won’t see all your Sketchbook blocks on the left, only the ones that meet the following requirements:
- Blocks must be EasyDraw blocks created on the EasyDraw drawing board, or blocks from the Library that have been drawn using EasyDraw.
- The block must have at least ONE parallelogram that’s larger than other patches.
- The size of the parallelogram must take up a certain amount of space in the block.
For example:
Sometimes you’ll just have to experiment to see if a block will work or not. The Four Patch block works as a background block because the largest patch is big enough (1/4 of the block). The Nine Patch block does not appear. This may be because the largest patch is not big enough (1/9 of the block) or because one patch is not bigger than the others in the block.
Notes:
- If your Sketchbook block is designed and/or colored asymmetrically, click on the block in the preview to rotate the design in the background block. Each click rotates the block 90 degrees. You will not notice a change with symmetrical designs.
- To view different blocks on different backgrounds more quickly, use the keyboard up and down arrow keys to scroll through the list of blocks and backgrounds.
- When you find the combination that you want, use the coloring arrows to change the colorings that are displayed before adding the block to the Sketchbook.
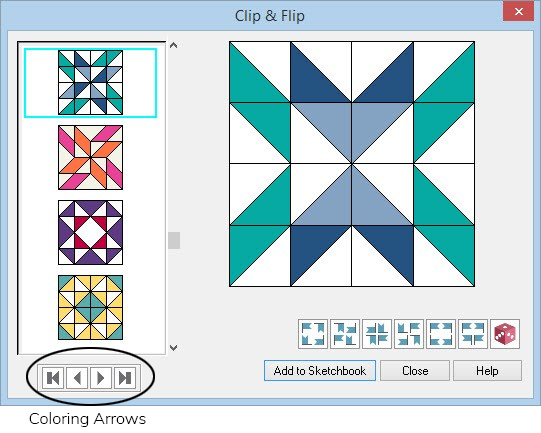
Clip & Flip
This Serendipity feature on the Block worktable takes the upper-left quadrant of the selected block and flips and rotates it in multiple directions in the other three quadrants of the block.
- Add your favorite block designs to your Sketchbook. You can use Library blocks or your own block designs.
- On the Block worktable, click New Block > Create Serendipity > Clip & Flip.
- On the left side of the dialog, you’ll see your Sketchbook blocks. Scroll through the list to find the block you want to use. Click to select it.
- Click on the buttons below the preview to change the orientation of the quadrants. Or use the Randomize button (dice) to view variations randomly.
- Use the preview to see what the block will look like. When you find the best design, click Add to Sketchbook. Your new block will be added to the end of the list in the Blocks section of the Sketchbook.
- Continue to create new, Clip & Flip blocks in the same manner, or click Close to close the dialog.
Note: Template patterns and Foundation Patterns are available for these blocks, however many blocks created with Serendipity are not easily foundation pieceable.
To print or color these blocks, first set them in a quilt on the Quilt worktable. Then color the blocks or print the patterns.
Notes:
To view different blocks in different frames more quickly, use the keyboard up and down arrow keys to scroll through the list of blocks and frames.
When you find the combination that you want, use the coloring arrows to change the colorings that are displayed before adding the block to the Sketchbook
Shrink & Flip

This Serendipity feature on the Block worktable shrinks the selected block and flips and rotates it in multiple directions in the four quadrants of the block.

- Add your favorite block designs to your Sketchbook. You can use Library blocks or your own block designs.
- On the Block worktable, click New Block > Create Serendipity > Shrink & Flip.
- On the left side of the dialog, you’ll see your Sketchbook blocks. Scroll through the list to find the block you want to use. Click to select it.
- Click on the buttons below the preview to change the orientation of the quadrants. Or use the Randomize button (dice) to view variations randomly.
- Use the preview to see what the block will look like. When you find the best design, click Add to Sketchbook. Your new block will be added to the end of the list in the Blocks section of the Sketchbook.
- Continue to create new, Shrink & Flip blocks in the same manner, or click Close to close the dialog.
Note: Template patterns and Foundation Patterns are available for these blocks, however many blocks created with Serendipity are not easily foundation pieceable.
To print or color these blocks, first set them in a quilt on the Quilt worktable. Then color the blocks or print the patterns.
Notes:
To view different blocks in different frames more quickly, use the keyboard up and down arrow keys to scroll through the list of blocks and frames.
When you find the combination that you want, use the coloring arrows to change the colorings that are displayed before adding the block to the Sketchbook.
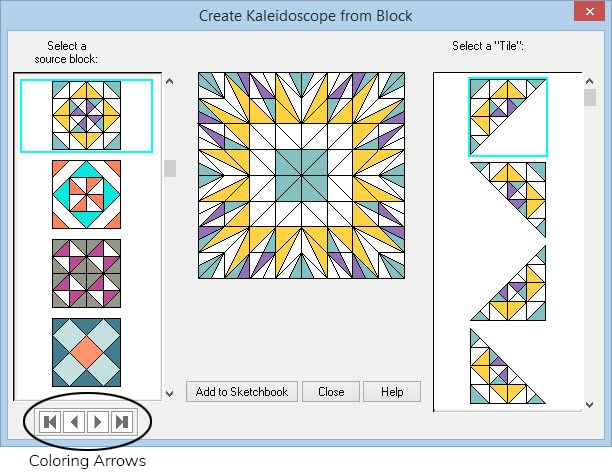
Kaleidoscope
![]()
This Serendipity feature on the Block worktable turns a simple block into a beautiful kaleidoscope block. Tiles are created by first cutting the selected Sketchbook block in half by its diagonals, creating the first four tiles. Then, it cuts the block into an X and uses the four triangles created from the X as the last four tile options. After selecting a Sketchbook block and a tile, the selected tile gets repeated in eight sections of the block, creating the kaleidoscope.
- Add your favorite block designs to your Sketchbook. You can use Library blocks or your own block designs.
- On the Block worktable, click New Block > Create Serendipity > Kaleidoscope.
- On the left side of the dialog, you’ll see your Sketchbook blocks. Scroll through the list to find the block you want to use. Click to select it.
- On the right side of the dialog, you’ll see the tiles created by cutting the selected Sketchbook block on its diagonals. Scroll through the list and select the tile you want to use.
- Use the preview to see what the block will look like. When you find the best design, click Add to Sketchbook.
- Continue to create new, Kaleidoscope blocks in the same manner, or click Close to close the dialog.
Note: Template patterns and Foundation Patterns are available for these blocks, however many blocks created with Serendipity are not easily foundation pieceable.
To print or color these blocks, first set them in a quilt on the Quilt worktable. Then color the blocks or print the patterns.
Notes:
To view different blocks in different frames more quickly, use the keyboard up and down arrow keys to scroll through the list of blocks and frames.
When you find the combination that you want, use the coloring arrows to change the colorings that are displayed before adding the block to the Sketchbook.
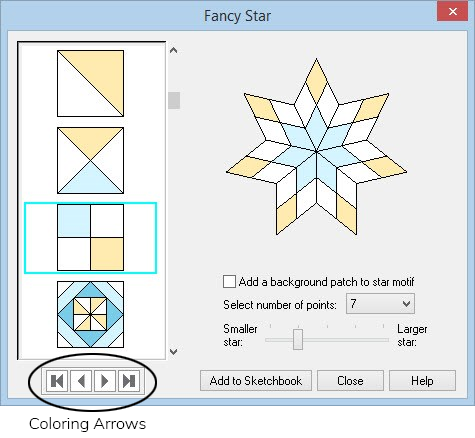
Fancy Star
This Serendipity feature on the Block worktable turns any block into a fancy star by repeating the selected Sketchbook block in 5 to 10 star points, depending on the number of points you select.
- Add your favorite block designs to your Sketchbook. You can use Library blocks or your own block designs.
- On the Block worktable, click New Block > Create Serendipity > Fancy Star.
- On the left side of the dialog, you’ll see your Sketchbook blocks. Scroll through the list to find the block you want to use. Click to select it.
- Put a check next to Add a background patch to star motif, if applicable.
- Select the number of star points you’d like for your block.
- Choose the size of the block.
- Use the preview to see what the block will look like. To rotate the block in the star points, click on the preview.
- When you find the best design, click Add to Sketchbook. Note: Any blocks saved without a background patch will be added to the Blocks section’s Motif’s tab.
- Continue to create new, Fancy Star blocks in the same manner, or click Close to close the dialog.
Note: Template patterns and Foundation Patterns are available for these blocks, however many blocks created with Serendipity are not easily foundation pieceable.
To print or color these blocks, first set them in a quilt on the Quilt worktable. Then color the blocks or print the patterns.
Notes:
If your Sketchbook block is designed and/or colored asymmetrically, click on the block in the preview to rotate the design in the frame. Each click rotates the block 90 degrees. You will not notice a change with symmetrical designs.
To view different blocks in different frames more quickly, use the keyboard up and down arrow keys to scroll through the list of blocks and frames.
When you find the combination that you want, use the coloring arrows to change the colorings that are displayed before adding the block to the Sketchbook.


