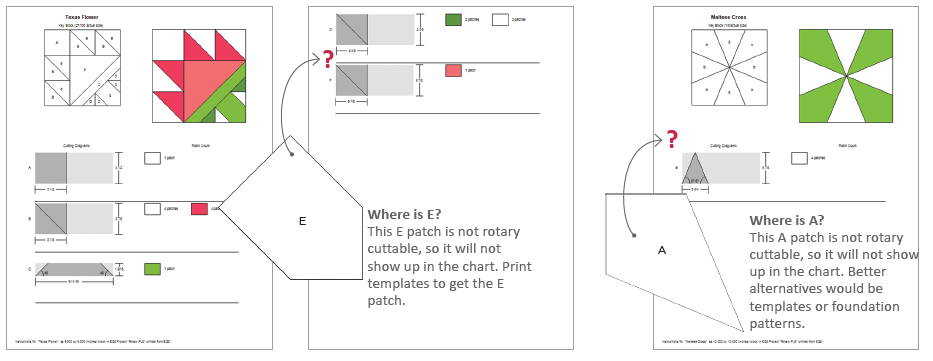
Not All Patches are Rotary Cuttable
EQ8 does not give results for all shapes. Kite shapes are one example. These shapes will be lettered in the Key Block but not listed in the chart. This is not a mistake. EQ8 intends for you to use templates for any patches not included in the chart. Depending on the number of patches that may be missing, selecting a different pattern type, like templates or foundation patterns, may be a better alternative.
How to Read the Rotary Cutting Chart
Please keep in mind that these are cutting diagrams (meaning none of the lines indicate stitching lines). No specialty stitching techniques are taken into consideration in these diagrams, such as oversizing units and squaring up later.
Here’s how to read the diagram below for each patch.
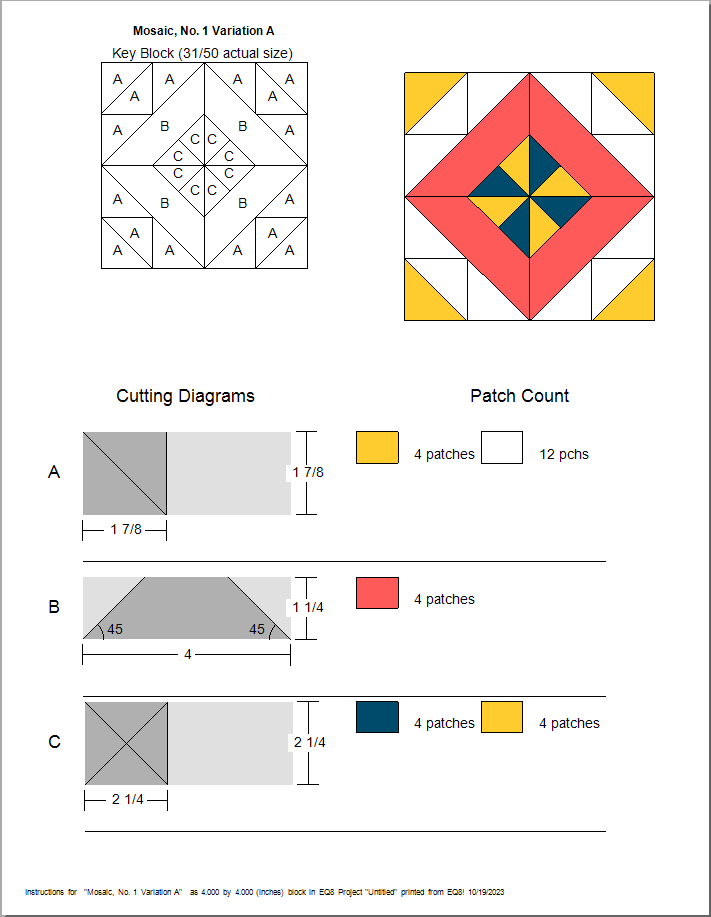
Patch A:
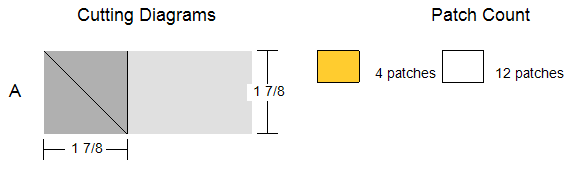
Cut a yellow strip 1 7/8″ wide. Cut 1 7/8″ squares from the strip. Then sub-cut the squares diagonally in one direction to make half-square triangles. You need 4 yellow triangles total (so you would cut 2 squares, and cut each in half diagonally to yield 4 triangles).
Cut a white strip 1 7/8″ wide. Cut 1 7/8″ squares from the strip. You need 12 white triangles total (so you would cut 6 squares, and cut each in half diagonally to yield 12 triangles).
Patch B:
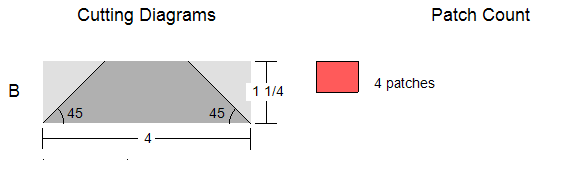
Cut a pink strip 1 1/4″ wide. Cut four 4″ rectangles from the strip. Cut each end of the rectangles to 45°.
Patch C:

Cut a blue strip 2 1/4″ wide. Cut a 2 1/4″ square from the strip. Then sub-cut the square diagonally in both directions to yield 4 quarter-square triangles. You need 4 blue quarter-square triangles total (so you would cut 1 blue square and sub-cut the square diagonally in both directions to yield 4 quarter-square triangles).
Cut a yellow strip 2 1/4″ wide. Cut a 2 1/4″ square from the strip. Then sub-cut the square diagonally in both directions to yield 4 quarter-square triangles. You need 4 yellow quarter-square triangles total (so you would cut 1 yellow square and sub-cut the square diagonally in both directions to yield 4 quarter-square triangles).
Rotarty Cutting Parallelograms
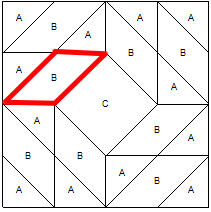
Below is an example using the Mosaic, No. 6(6) block at 8 inches x 8 inches.

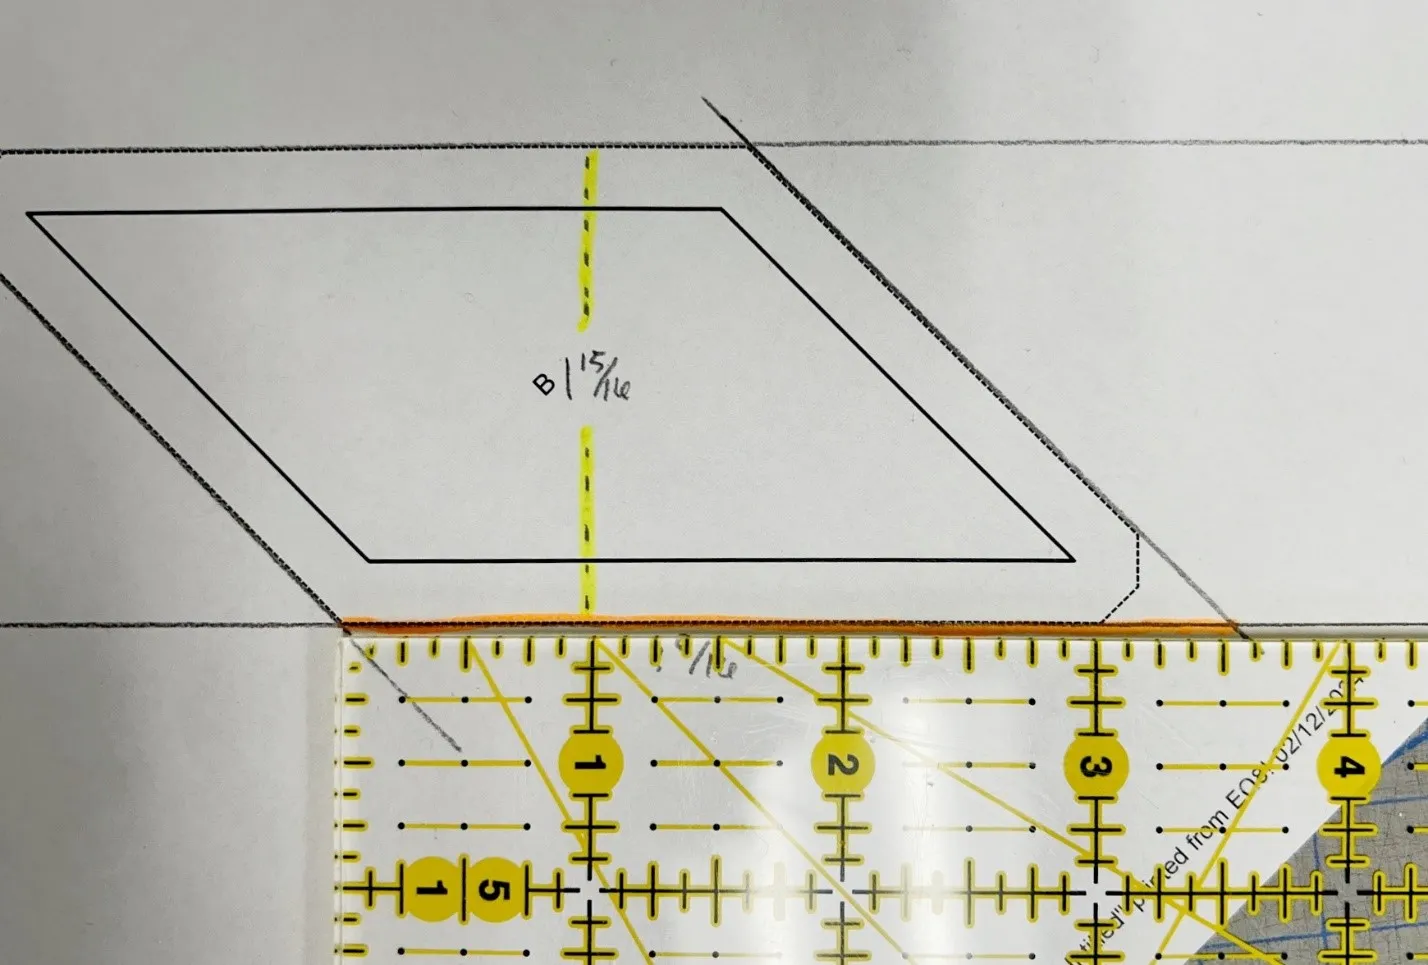
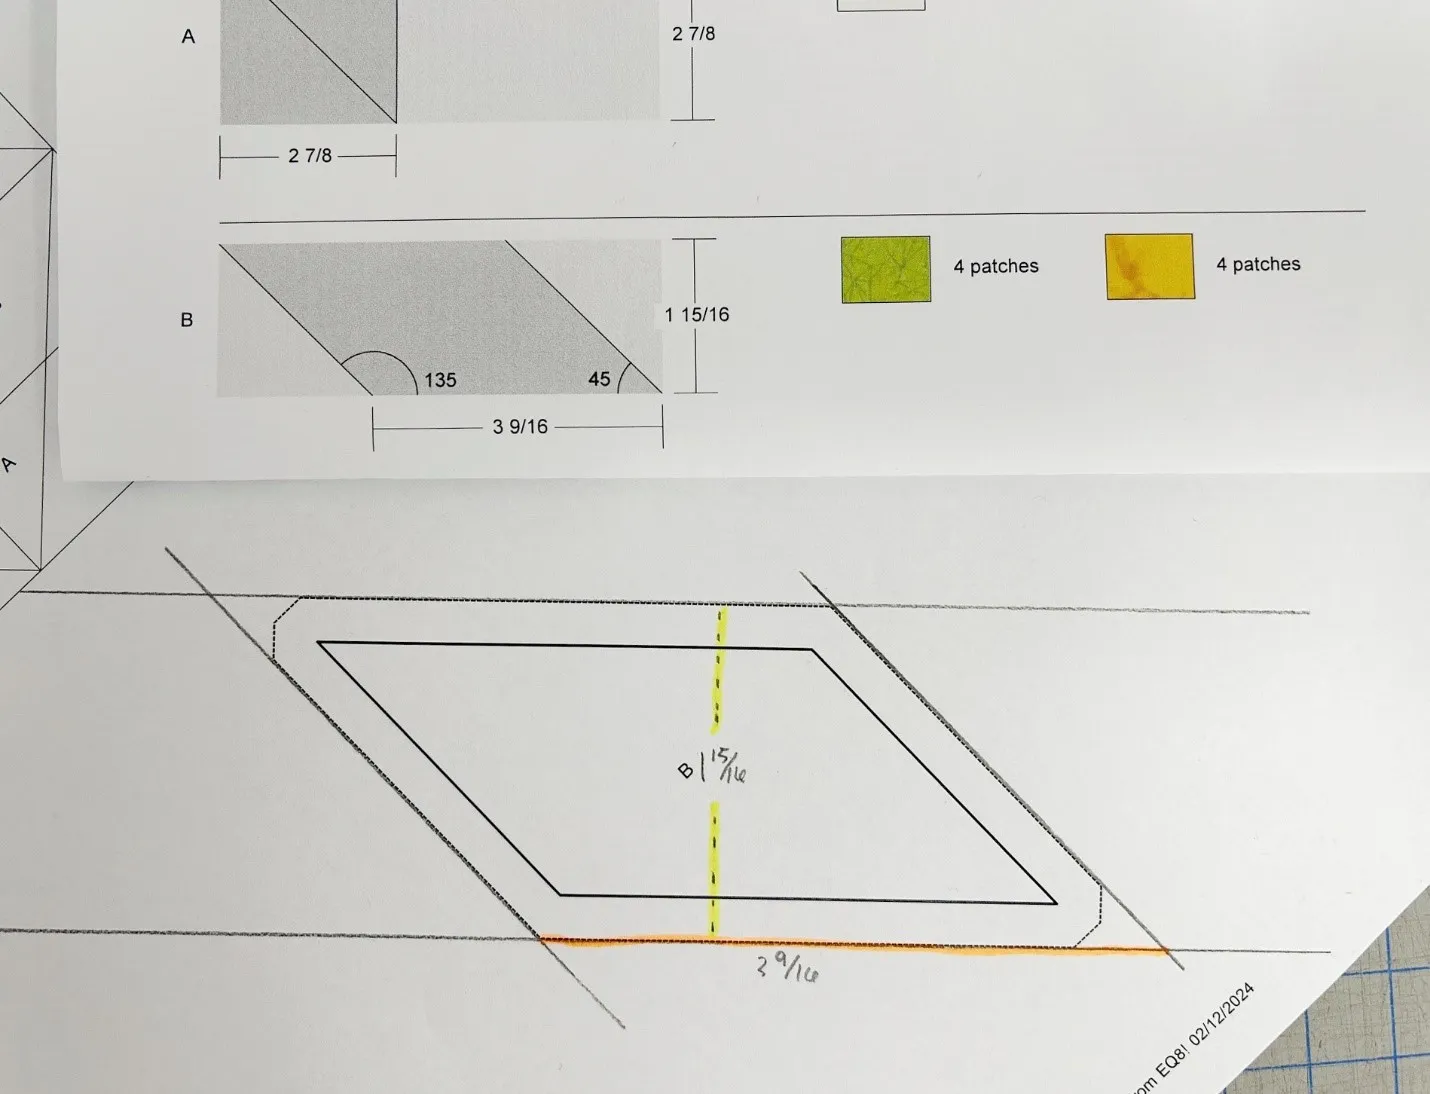
Here’s what the Rotary Cutting chart from EQ8 shows for piece B…
With the rounding set to 1/16”:
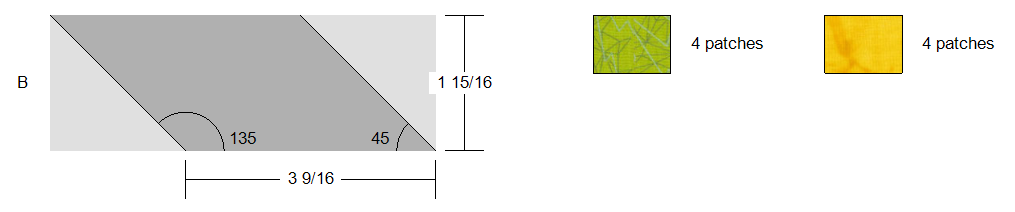
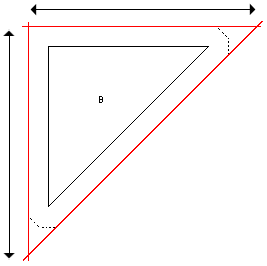
The 1-15/16” dimension is the perpendicular measurement between the two longest sides of the parallelogram (highlighted in yellow below).
The templates clip the seam allowance at the corners so it’s easier to match up your patches. To find the measurement that appears on the rotary cutting chart, you have to extend the seam allowance points.
The 3-9/16” measurement is highlighted in orange below.
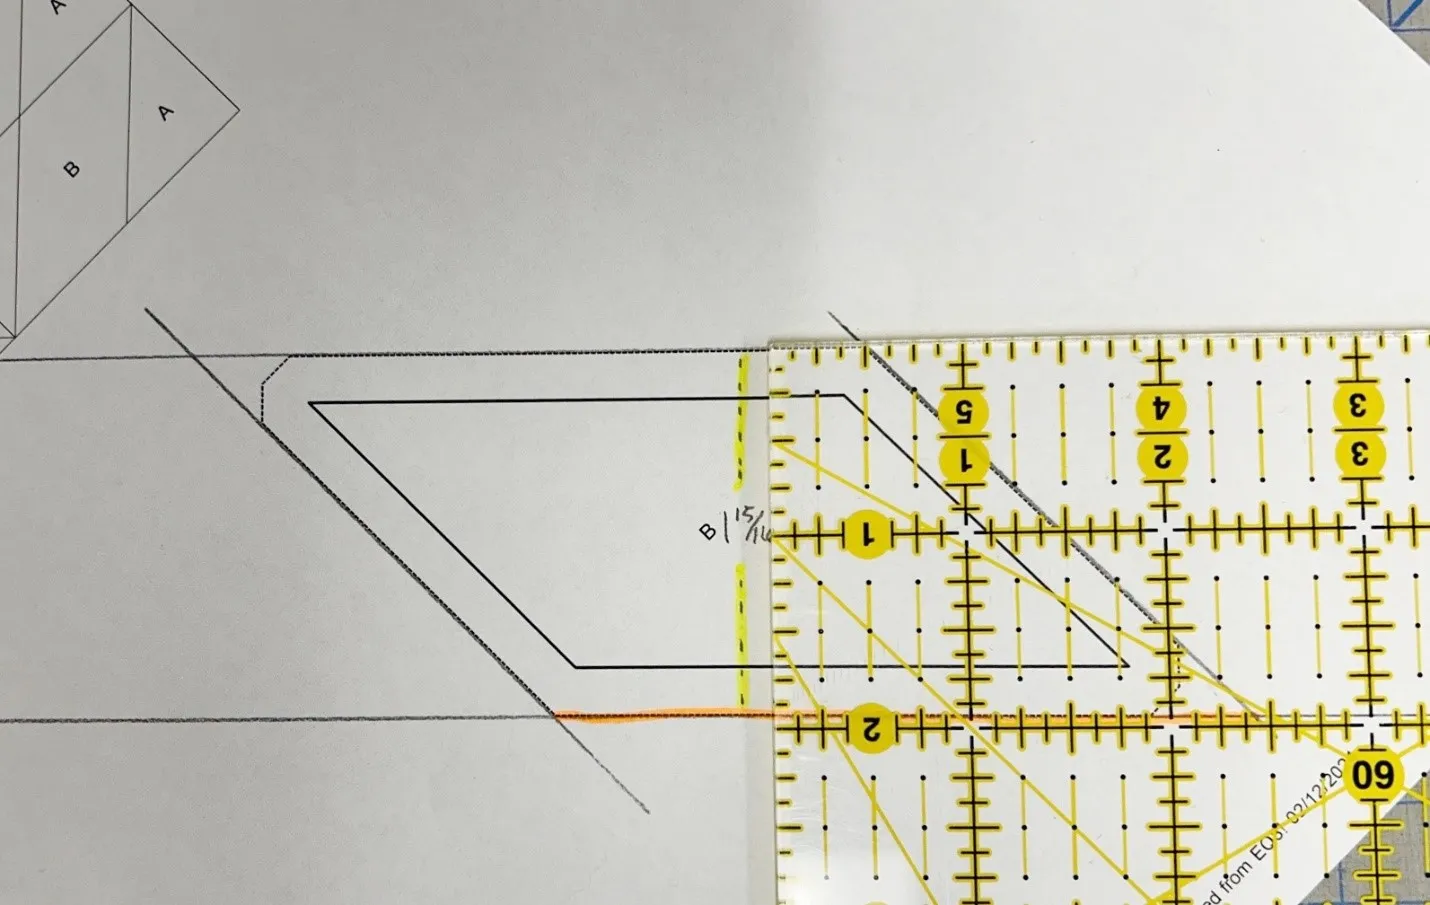
Below is the rotary cutting printout and the template printout together, showing where the dimensions are measured.
You can always print the templates for a block to double-check the measurements.
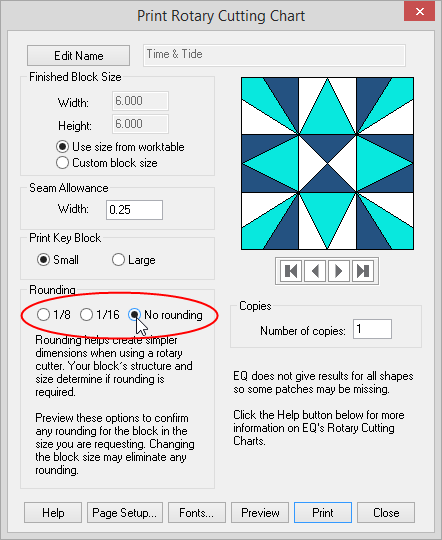
Rotary Cutting Requires Rounding
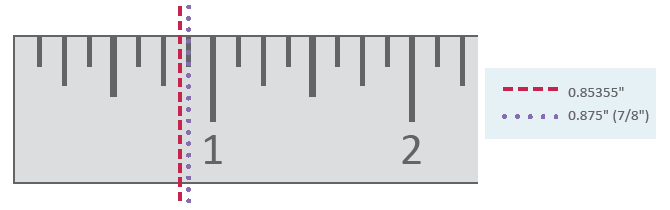
Rotary cutting dimensions are nearly always approximations. For example, the 7/8 inch (.875) that quilters conventionally add for half-square triangles is really .85355 inches, rounded off to the nearest 1/8 inch so that we can read it on the ruler. Experienced quilters in fact cut a little “shy” in this case, since .85355 is a little less than .875.
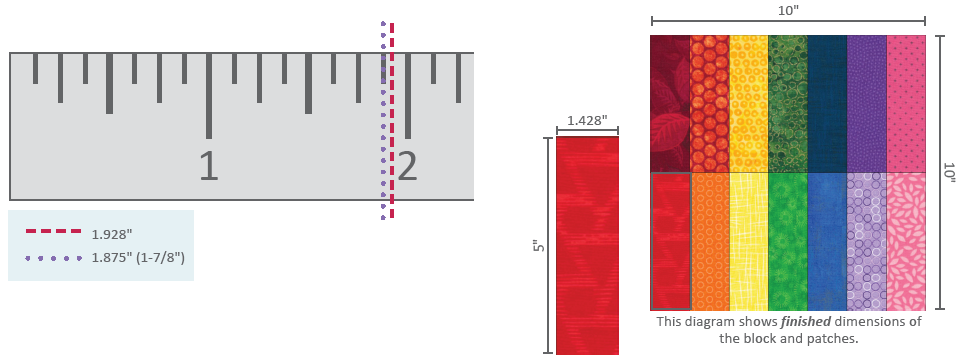
Because rounding is inevitable, this means that several small inaccuracies can add up to something significant. For example, this block has 7 patches across by 2 patches down. If you wanted a 10-inch block, this would mean that each rectangle has a finished size of 1.43″ by 5″ so we would need to cut 1.93″ by 5″ and 1.93 is not to be found on the ruler. EQ8 will round to 1 7/8″ by 5 1/2″. By the time we pieced 7 of these small inaccuracies together, our finished block is 9 5/8″ by 10″. That’s 3/8″ too narrow!
Getting the Most Accurate Charts
EQ8 will give you the exact measurement of the patches so that you can decide if you want to use the Rotary Cutting Chart or some other pattern printing method.
In the Print Rotary Cutting Chart dialog box, choose No rounding. Preview the results. Compare the sizes with the rounded values. This will give you the information you need in order for you to make a judgment on using the chart.
Templates May Be Used as a Check
EQ8 templates are always accurate. If you are uncertain about rotary cutting dimensions in some cases, print the templates as a check. The actual (unrounded) dimensions for rotary cutting may be measured from the dotted (seam allowance) lines on the templates. First extend the dotted lines until they cross. Then measure the resulting total length and height.
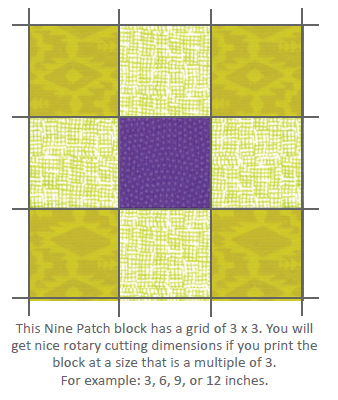
Remember Design and Size Go Hand-in-Hand
Visualize a grid of squares over the design of the block to help you determine the best size to make a block. For example, a Nine Patch style block works well at 3, 6, 9, 12 and so on for the overall size. In the sample block above with 7 across, 10 inches is not a good size choice. If we choose 10.5 inches for the size of the block and turned off all rounding, the Rotary Cutting Chart tells us to cut the strips 2.0″ by 5.75″. When we turn on rounding, we get the same sizes! So by changing the overall block size, we’ve eliminated all the rounding.