
From Mike and Vicki Shelter at Soft Scrap
EQ7-PC works with any Windows 10 based tablet. As long at the tablet is running the FULL version of Windows 10 you should have no problem. (See EQ7 system requirements)
With a tablet, I can go into a fabric store, select fabrics and audition them in MY DESIGN right in the store. Then, once I know the fabrics will work, I can purchase them and go to work. No more back and forth to the store only to find out they don’t have enough of what I want.
[NOTE: From this point on the directions apply to the PC tablet or any camera or phone camera.]
The key to doing this successfully is SCALE. The scale needs to be 1 to 1. In other words, a 2” square swatch of fabric at the fabric store should, in EQ7, represent a 2” fabric swatch. When you scan fabric on a flatbed scanner, using the recommended settings, all the work is done for you. In the Photo Worktable you simply crop it to the size swatch you want and save it as a fabric. The scale is consistent, i.e. 1 to 1.
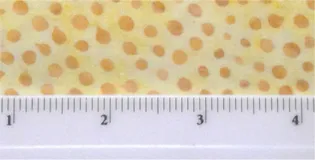
With a camera or a tablet or a phone, the scale is determined by the distance between the camera and the fabric and the zoom setting of the camera. To ensure that the final SCALE in EQ7 is 1 to 1 your need a reference. I carry a white 6” plastic ruler that I use as my reference. It is a 2 STEP process for capturing the swatch at the proper scale.
STEP 1 Taking the Picture with a Reference
Position the fabric so there is an even light across the fabric. Generally, you don’t have to take it off the bolt, just lay the bolt down where the light is even. Place the ruler parallel to the grain.
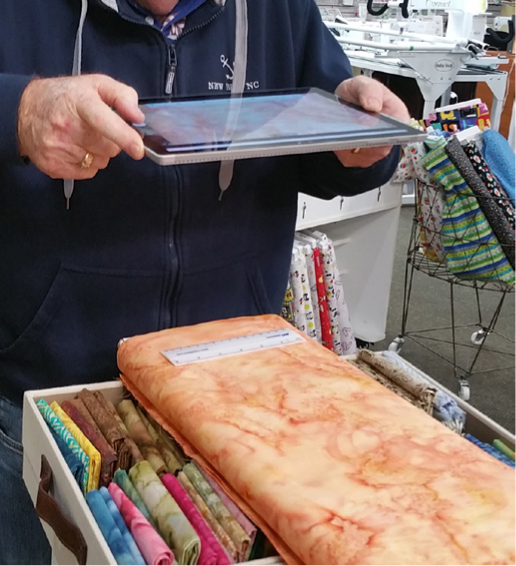
Frame the picture so the ruler is at the bottom of the frame, and take the picture. Now save the picture of the fabric in a folder you can find later, typically it is THIS PC > PICTURES > CAMERA ROLL.
STEP 2 Adjusting Scale, Color and Saving as a Fabric
Open EQ7 and go to the project where you want to audition fabric. Select the Image Worktable (Work on Image) and Select IMAGE > IMPORT IMAGE (or click the Import Image button).

Find the picture of the fabric and click on it. It is now on the Worktable. At this point I always save it to the Sketchbook, ![]() that way if I need to go back and start over I have a reference.
that way if I need to go back and start over I have a reference.
Next you need to crop the picture. Decide on the size of the final swatch. You can make your swatches any size but, typically I make my swatches 2” x 2” unless there is a repeat I want to capture. You need to use the mouse or pen to define the crop area … Don’t use the Precision Bar at this point because you DON’T HAVE THE SCALE SET YET. Using the 2” swatch size as an example, select the Crop ![]() tool and move the left cropping marker to the zero point on the ruler in the picture and the right cropping marker to the 2” point on the ruler. Now move the bottom cropping mark up until it is above the top of the ruler.
tool and move the left cropping marker to the zero point on the ruler in the picture and the right cropping marker to the 2” point on the ruler. Now move the bottom cropping mark up until it is above the top of the ruler.
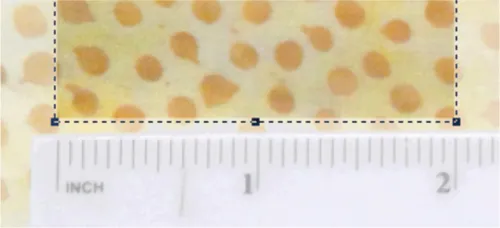
Next look at the Precision Bar and find the width display. Take that number, whatever it is, and manually enter it into the height field. You now have a square sample.
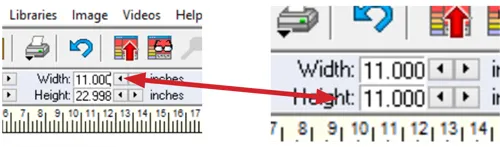
Click the check mark to crop it.

You have a square sample but it is still not to scale. Go to Image > Image Resize. Set the DPI to 72, make sure Maintain Aspect Ratio is checked, and in the width field enter the width of sample, in our example 2”.
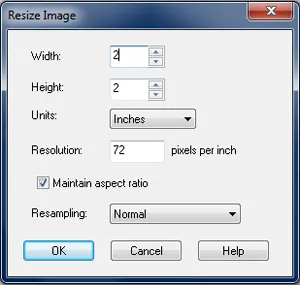
Click OK and the swatch is cropped, sized and scaled to 2” by 2” (in our example).
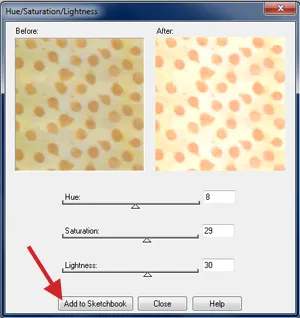
Finally look at the color of the image on the computer and make sure it accurately reflects the color of the actual fabric. When you use a flatbed scanner, the quality of the light is known so the color of the sample is accurate. When you take a picture in the fabric store, the store lights can affect the color of the sample.
Use the IMAGE > COLOR > Hue/Saturation/Lightness control to make changes in the picture. I generally don’t spend a lot of time I just try to get it close. In the Adjustment window, Click Add to Sketchbook, then Close.
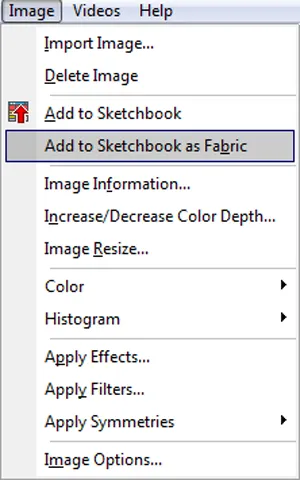
The last step is to change the PICTURE of the fabric into a FABRIC SWATCH.
Select IMAGE > Add to Sketchbook as a Fabric.
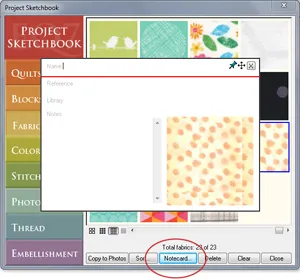
I always go to my Sketchbook and check to make sure the fabric is there. Also, I click on the fabric and then click on Notecard. Here I enter the name or SKU or UPC code of the fabric and make notes on where and when I took the sample and how much the store has in stock.
Repeat the process with all your samples and you end up with swatches you can use to audition the fabric in your design.


