

Printing foundation patterns for a block can be done from the Block Worktable or the Quilt Worktable. If you want to print foundation patterns for a block from a quilt, click directly on the block in the quilt to select it and enable the block printing options in the palette.
Click Foundation in the palette to display the Print Foundation Pattern dialog.

Numbering tab

EQ8 automatically numbers foundation patterns for you. If you would like to change the numbers, you can by following the instructions below. If the foundation pattern is made up of multiple sections, each section will be outlined in green.
To change the numbers on a foundation pattern
- Click on the Change Numbers button.
 The current numbers in the pattern will lighten to gray so you can use them as a reference.
 - Click on the patches in the order you want them numbered. After you click, the new number will appear in black.
- If you want to undo a numbering hold down the Shift key on your keyboard and click on the patch you’d like to un-number. If you want to begin again, click the Start Over button.
- If you want EQ to finish the numbering for you, click the Finish button.
To zoom in on a patch for numbering
If your pattern is complicated with many small pieces, like a complex pineapple, for example, you may want to zoom in to place numbers on patches.
Click the Zoom in tool. ![]() The block preview will automatically zoom. Whenever you click Zoom in, the Hand tool
The block preview will automatically zoom. Whenever you click Zoom in, the Hand tool ![]() will become selected.
will become selected.
Position the mouse cursor over the block and click and hold the left mouse button, and drag the block to expose the area you want to number. If you need to use the Hand tool multiple times, you need to click on the Hand tool to enable it again.
After each use of the Hand tool, the tool changes to the Number tool. Click on the patch to place the next number in the sequence.
When you are done, click the Zoom Out tool![]() .
.
Sections tab
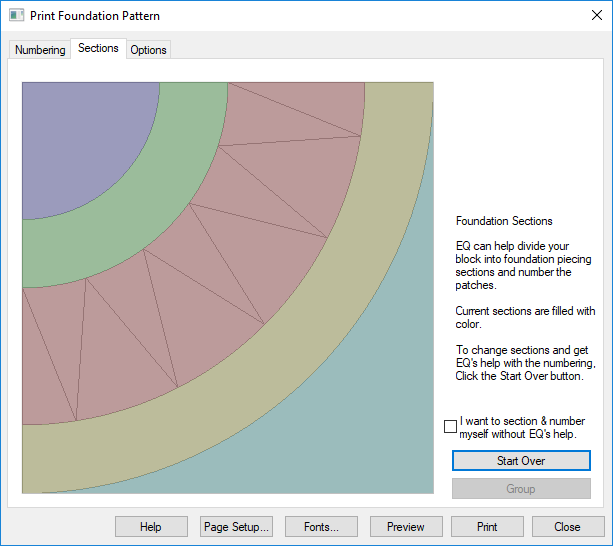
Some paper piecing blocks (more complicated ones) need to be pieced in sections. Each section gets pieced separately. Then all the sections are sewn together to create the final block. EQ8 will automatically separate sections when necessary. You can change the sections if you like.
To redefine sections in a multi-section foundation pattern
When you click on the Sections tab, the current sections are defined by color for each different section.
- Click the Start Over button. All color will disappear.
- Click directly on the patches that you want to be in a section. The patches will fill with gray when you click on them.
- If you’d like to undo, hold down the Shift key on your keyboard and click on the patch you’d like to un-section. Or, click the Start Over button to begin creating all the sections again.
- When all patches for a section are gray, click the Group button. A random color will fill all the patches in the section.
- Continue to create sections until all patches are included. Then go to the Numbering tab to check the numbering order. Each section will have a different letter associated with it.
If you don’t want EQ to help with sectioning or numbering of your pattern, put a check in I want to section & number myself without EQ’s help. You will need to section the parts of the block that you want to generate a pattern for, and you will need to number every patch. You are not required to section every part of the block. Only the sections that you define will appear on the printout.
Options tab
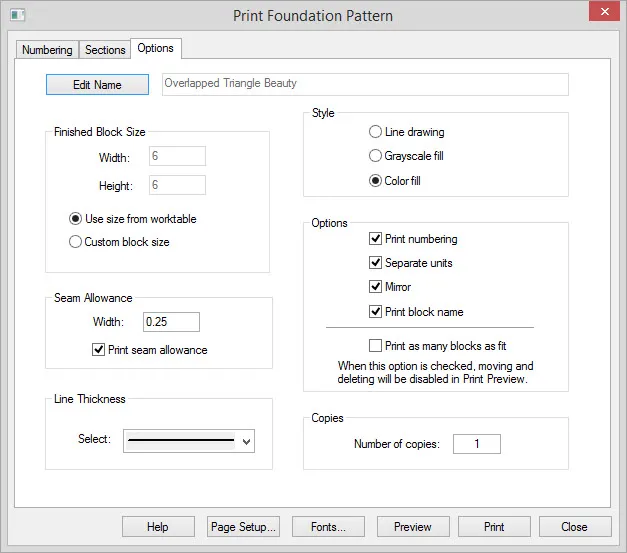
Edit Name
The name shown in the dialog will appear at the top of your printout. If it is a Library block, it will always have a name. If you drew the block yourself or you want to change the name, click Edit Name, type a new name in the entry, and then click Apply. This will also update the name on the Notecard.
Finished Block Size
By default, Use size from quilt (if printing from the Quilt Worktable) or Use size from Worktable (if printing from the Block Worktable) will be selected. Width and height will be displayed, but the controls will be disabled. If you want to set the size yourself, select the option for Custom block size. Then type any size you want for the block. Note! You are typing in the size of the finished block that you want. EQ8 will automatically add the seam allowance for you.
Seam Allowance
If you want a seam allowance to print, check Print seam allowance and enter the width of the seam allowance. If you do not want a seam allowance to print, make sure the box is unchecked.
Line Thickness
Choose the line thickness you prefer for your printouts by clicking on the down arrow to display the examples. Then click directly on the line thickness you want to select it.
Style
Check the box for how you’d like your printout to appear: Line drawing, Grayscale fill, or Color fill. Learn more about Grayscale fill>>
Options
- Print numbering
Prints the paper piecing numbers on the pattern for you. - Separate units
Prints multi-unit patterns as separate units with a label. If you plan to move or delete sections of the pattern in the Print Preview, this option must be unchecked. - Mirror
Flips the pattern horizontally. - Print block name
Prints the pattern name on the printout for you. - Print as many as fit
Prints as many patterns on a page as it can. If you plan to move or delete sections of the pattern in the Print Preview, this option must be unchecked.
Copies
Select the number of copies you want of the printout.


