The Drawing Board Setup dialog lets you customize the Block worktable settings. To display the Drawing Board Setup dialog, click the settings button on the left toolbar while on the Block Worktable.
![]()
General Options
Block Size
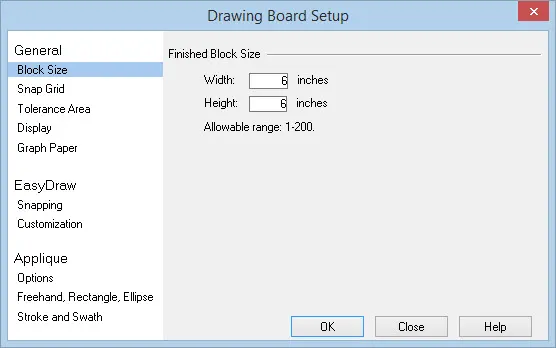
Finished Block Size:
Type the size you want for the block. Allowable range is 1-200.
This is the same setting as indicated in the Precision Bar on the worktable.
![]()
Snap Grid
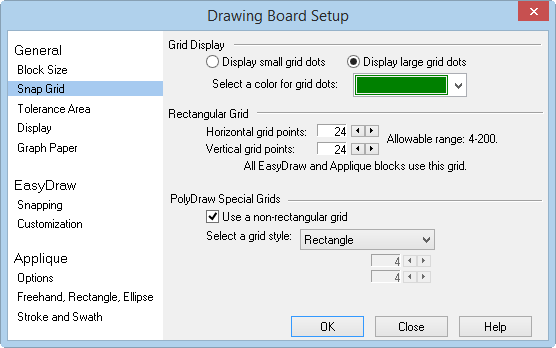
Grid Display:
Choose Display small grid dots or Display large grid dots. These are the little dots that show on the worktable to which you can snap the lines.
Click the drop-down list to Select a color for grid dots.
Rectangular Grid:
Click the right and left arrows to change the number of grid points on the horizontal axis and on the vertical axis. Allowable range is 4-200.
These are the points to which your drawing will snap, if Snap to grid is turned on. This is the same setting as indicated in the Precision Bar on the worktable.
![]()
PolyDraw (Pieced tab) Special Grids:
Check Use a non-rectangular grid if you want to use one of the grid options in the drop-down menu.
If you check this option, the Select a grid style drop-down will become enabled. Click the down arrow to display the grid options. Click to choose the one you want to use.
Based on the type of grid chosen, you can change the dimensions or rings and spokes. Click the right and left arrows to change these numbers.
Tolerance Area
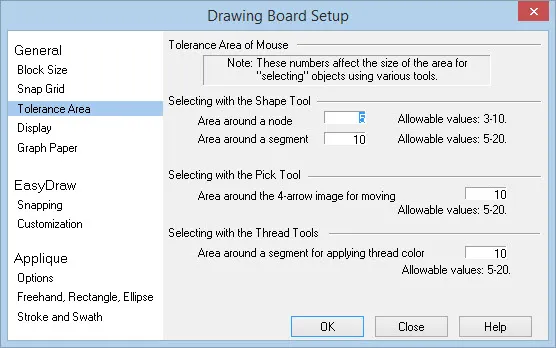
These numbers affect the size of the area for “selecting” objects using various tools.
Selecting with the Shape Tool:
These two entries adjust the area or region, in pixels, surrounding a node or segment when using the Shape tool. In other words, if this number is at 5 and you have your mouse 15 pixels away from the node when you click, EQ won’t select the node. If you are within 5 pixels, EQ will select the node. This feature gives you the ability to set the number small when doing fine, tedious drawings. In general you will probably want this number big. Allowable values are 3-10 for a node and 5-20 for a segment.
Selecting with the Pick Tool:
Enter a number for Area around the 4-arrow image for moving to increase or decrease the area surrounding the move cursor. Allowable values are 5-20.
Selecting with the Thread Tools:
Enter a number for Area around a segment for applying thread color to adjust the area, in pixels, surrounding a segment making the thread tools more or less sensitive when applying thread color. In general, you will probably want this number big. Allowable values are 5-20.
Display
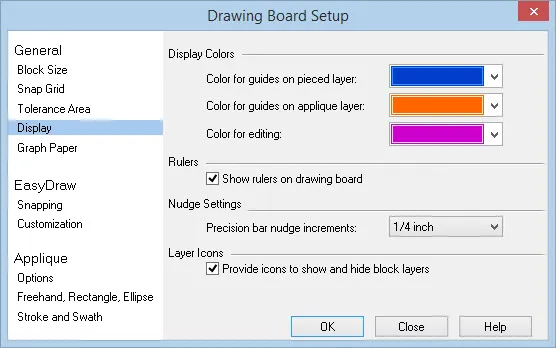
Guide Color:
Click the drop-down list to Select a color for guides for the pieced layer, applique layer and for editing in PolyDraw.
Rulers:
Check Show rulers on drawing board to display rulers on the Block worktable.
Nudge Settings:
Click the drop-down menu to set the Precision Bar nudge increments. This option allows you to choose the increments that the Precision Bar will use to nudge an object when you’re adjusting its size or position. Each click of an arrow on the Precision Bar will nudge the number by the amount set here. Allowable values are 1/32″ – 1″. The default is one quarter inch (0.25).
Layer Icons:
Check Provide icons to show and hide block layers to place a light bulb image on the tabs. When the light bulb is clicked, it will turn the current layer on or off. You’ll know the layer is off when the light bulb is gray, and you’ll know the layer is on when the light bulb is yellow or lit up. You’ll find this feature useful when drawing PolyDraw blocks or EasyDraw + PolyDraw blocks. If you turn off the current layer, it will automatically turn back on as soon as you click on the worktable.
Graph Paper
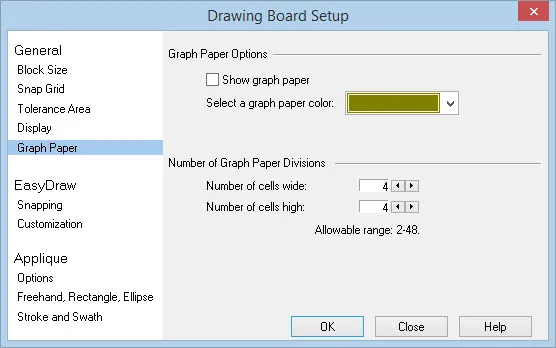
Graph paper is used as a visual design aid to help locate where to place design elements. It should not be confused with the Snap Grid, which is used to snap design segments to precise locations.
Graph Paper Options:
Check Show graph paper to display the graph paper on the worktable. Click the drop-down menu to Select a graph paper color.
Number of Graph Paper Divisions:
Enter a number or click the left and right arrows to change the numbers for cells wide and cells high in your graph paper. Allowable range is 2-48.
These are the same settings as indicated in the Precision Bar on the worktable.
![]()
EasyDraw Options
Snapping
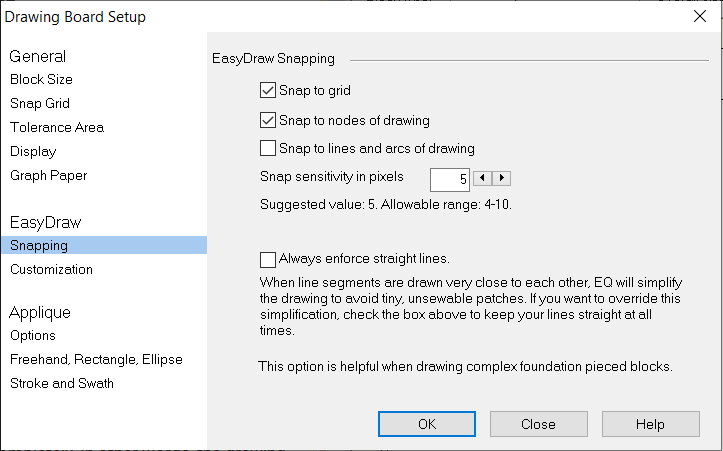
EasyDraw Snapping:
- Check Snap to grid to force segments to behave like magnets snapping to the nearest grid point when you release the mouse.
- Check Snap to nodes of drawing to force a segment to snap to a node of an already drawn segment. The node is not required to be on a grid point.
- Check Snap to lines and arcs of drawing to force a segment to snap to the lines or arcs of a drawing.
These are the same settings as indicated in the Precision Bar on the worktable.
![]()
Enter a number in Snap sensitivity in pixels to change the sensitivity area. If Snap to nodes of drawing or Snap to lines and arcs of drawing is checked, this number represents the range in pixels for the snapping to take place. For example, if the sensitivity is set at 10, the cursor must be within 10 pixels of a node, line or arc for it to snap. If the cursor is outside of this range, the segment will start or stop where it is dropped instead of snapping. Suggested value is 5. Allowable range is 4-10.
- Check Always enforce straight lines to keep lines straight at all times. When line segments are drawn very close to each other, EQ will simplify the drawing to avoid tiny, unsewable patches. If you want to override this simplification, check the box above to keep your lines straight at all times.
Customization
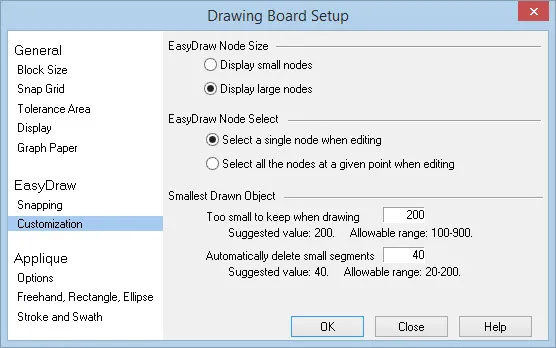
EasyDraw Node Size:
Click to select Display small nodes or Display large nodes.
EasyDraw Node Select:
Click to select whether you want to Select a single node when editing, or to Select all the nodes at a given point when editing.
Smallest Drawn Object:
EasyDraw requires lines and arcs to intersect one another so EQ can turn the objects into a patches. Because the computer is capable of drawing and saving extremely small segments, it does not mean that the resulting patches that get created are practical to actually sew. The two entries here have suggested values that we have found useful for drawing. If you are trying to draw something extremely complicated, reducing these numbers may be helpful. If you have difficulty drawing and want to force EQ to force you to draw longer lines, then try increasing these numbers to the upper range. Unless you’re working on something specific, we suggest that you just leave these values at the default settings.
Applique Options
Options
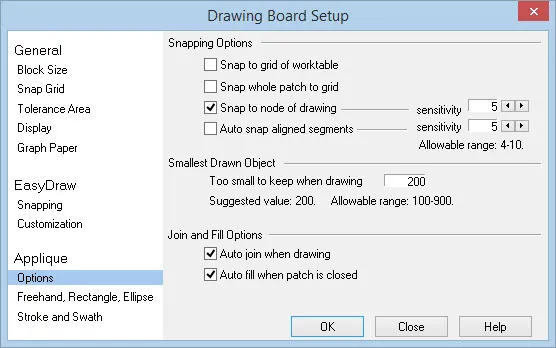
Snapping Options:
- Check Snap to grid of worktable to make lines or curves start on a grid point when you begin dragging and snap to a grid point when you release the mouse.
- Check Snap whole patch to grid to make patches snap to the grid. The node that gets snapped to the grid is the node that is closest to a grid point.
- Check Snap to node of drawing to automatically snap to an existing node if it finds one within the range set in the Sensitivity box. Allowable range is 4-10.
- Check Auto snap aligned segments to make lines that are the same length snap on top of one another. It is important to position the lines directly across from one another to see them snap on top of one another. If one line is higher or lower than the other, the snapping will not occur. The distance for snapping is determined by the number you set in the Sensitivity box. Allowable range is 4-10.
These are the same settings as indicated in the Precision Bar on the worktable.
![]()
Smallest Drawn Object:
Since the computer is capable of drawing very small segments, it is possible to accidentally click your mouse using Applique and create a segment that you did not intend to draw. These setting will help you avoid these unwanted segments. Suggested value is 200. Allowable range is 100-900.
Join and Fill Options:
- Check Auto join when drawing to make lines or curves automatically join (connect) to one another as you draw or as you edit.
- Check Auto fill when patch is closed to fill all closed patches with a cream color, indicating it is a closed patch.
These are the same settings as indicated in the Precision Bar on the worktable.
![]()
Freehand, Rectangle, Ellipse
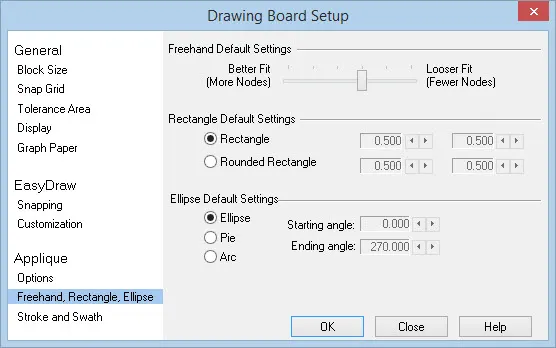
Freehand Default Settings:
Move the slider bar left or right to change how the Freehand tool draws. The closer the slider bar is to Better Fit, the more nodes created when you draw. This will require a lot of editing, but will make your drawing more accurate. The closer the slider is to Looser Fit, the fewer nodes created when you draw. This will create a smoother drawing with less editing.
Rectangle Default Settings:
Click to select whether you want the Rectangle tool to draw a Rectangle with squared off corners, or a Rounded Rectangle with custom corners. If you choose Rounded Rectangle, the corner numbers will become enabled. Use the left and right arrows to change the roundness of each corner. See the Rectangle Tool.
These same settings can be found in the palette under Rectangle Properties.

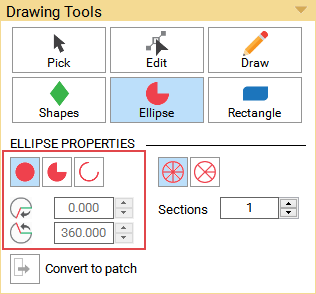
Ellipse Default Settings:
Click to select whether you want the Ellipse tool to draw an Ellipse, Pie or Arc. If you choose Pie or Arc, use the left and right arrows to change the Starting angle and the Ending angle. See the Ellipse Tool.
These same settings can be found in the palette under Ellipse Properties.
Stroke and Swath
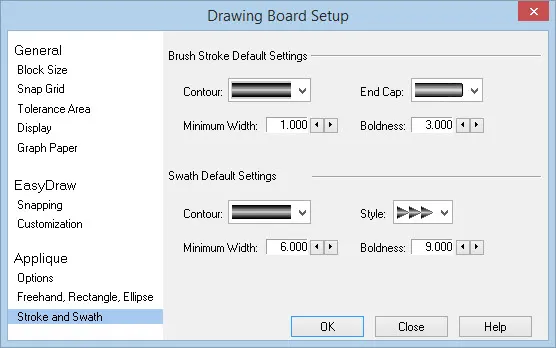
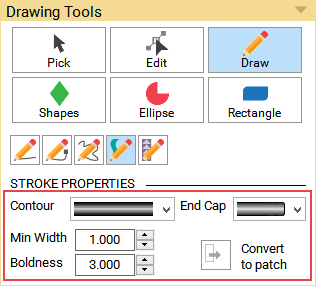
Brush Stroke Default Settings:
Use these options to change how the Brush Stroke draws. See the Brush Stroke Tool for examples.
- Click the Contour drop-down menu to choose the style of the stroke.
- Click the End Cap drop-down menu to choose the stroke end.
- Use the left and right arrows to change the settings for Minimum Width (0-9) and Boldness (1-9).
These same settings can be found in the palette under Stroke Properties.
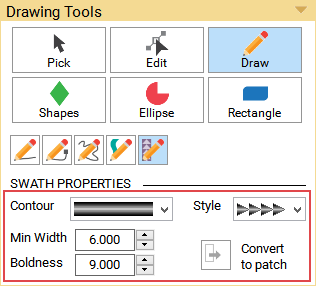
Swath Default Settings:
Use these options to change how the Swath draws. See the Swath Tool for examples.
- Click the Contour drop-down menu to choose the style of the stroke.
- Click the Style drop-down menu to choose the shape of the style.
- Use the left and right arrows to change the settings for Minimum Width (0-9) and Boldness (1-9).
These same settings can be found in the palette under Swath Properties.